
PART 4: MAKING THE ELEVATOR PITCH
An elevator pitch is a compelling and short speech (two minutes or less) about your research intended for someone who isn’t in your field. Think of it as what you might say to a member of your intended audience who you just met. As a first step, please read this short article in Nature that discusses how to give an elevator pitch. The article features Nancy Baron, who wrote the book chapter about the Message Box that we just read. The article should seem very familiar, as Nancy covered many of the same subjects in the chapter.
Once you have read up on elevator pitches, please prepare a two minute pitch about your own research. The point of this pitch isn’t to pack all of your research into two minutes. Rather, it is to make your audience interested in hearing more. As you put your pitch together, please remember that although you are welcome to make brief notes, it is a terrible idea to actually write out a full script. Written language is very different than spoken language and nothing is more excruciating than hearing someone recite a script.
Please record a video of yourself giving your elevator pitch using your iPhone and your iPhone tripod (the GorillaPod). You don’t need to worry about using your lapel microphone for this exercise (regular iPhone microphone is fine). How do you do use your iPhone to record video? Watch this short video!
And in case you were wondering how to use your GorillaPod, the following video is for you.
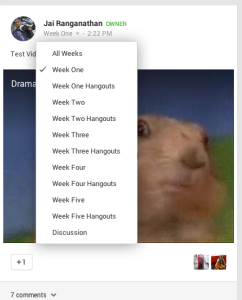
Uploading your first video. We want you to make your video available on the Google+ class community page (to which only class participants have access), so that others in the class can give you feedback. As a first step, upload your video to YouTube. Don’t worry! The whole world won’t see your video, because you will set your video as unlisted in the privacy settings. If you have watched the first video in these instructions, you know how to enter the community page and how to create your first video post. Create that post, making sure to give the post the category of “Week One”. Post categories can be seen directly below your name, as illustrated in the image to the right. In the text of your post, please state your intended audience, as specifically as you can.
Thanks for the detailed instructions! By when do we need to complete our assignments- in advance of our discussion group or by the end of the week?
Completing the assignments in advance of your discussion group would be ideal. At the least, before your group, it would be good to have done the readings and prepared your own message box.
Thanks, Jai!