
Welcome to the week four of the poster class!
We’ve been slowly building our posters to have maximum visual impact, while at the same time maximizing poster readability. The poster layout gives the clean aesthetic feel of professional design. Your figures draw attention and tell a clear and concise story. Now it is finally time to incorporate the readable part of your poster, the text!
Too many words
In week one, we asked people what they disliked in posters they had seen. Probably the most common answer was, “Too many words.”
This gets back to the message box from week one. We asked who the audience was, and what the key thing for the audience to learn was.
If your audience are fellow professionals with technical expertise, you can use some technical terminology. Technical terms can be very concise, which is an advantage on a poster. Similarly, you may be able to leave out definitions and basic information that people in your field will be familiar with. But if your audience aren’t pros, help them out! Spell out words that you might normally abbreviate. Use short, plain English words instead of digging out the thesaurus.
Keeping your key message in mind can help focus your text to be as lean as possible. Unfortunately, there are not many shortcuts to cutting your text short, so to speak.
- Show your text to someone else and ask them to read through your text.
- Walk away from your text for a few days, then come back to it. It’s amazing how often problems that escaped your notice suddenly leap out at you when you return.
- Be willing to be ruthless. Writers say that you have to “kill your darlings”: namely, be willing to cut things that don’t help your story, even if you worked hard on them or liked them. Decide on what is essential, and show only that. Leave everything else for chatting with your audience.
Some people try to keep their poster short by using lots of bulleted lists. This can work, but is trickier than it first seems. Part of this is a technical problem: not all software handles the spacing of bullets well. The bullet can seem far too small or large compared to the rest of the text, or be too close or too far away in spacing from the main text. Adobe Illustrator, unfortunately, does not handle bullet lists very well unless you are willing to do a lot of tinkering.
More importantly, people are trained to read in sentences. Compressing sentences down to bullet points can leave the text as cryptic as tea leaves. Many bulleted lists are written as sentences, making the bullets redundant. All you’ve done is take up more space.
Basic typesetting
Perhaps more than any other part of poster design, typesetting is a craft. There are not many hard and fast rules in using type as much as there is a long process of trial and error and constant tweaking. But attention to typesetting details improves the appearance of your poster dramatically. People might not be able to pinpoint why the poster looks better, but they will notice.
Choosing a typeface
There are an embarrassment of riches these days when it comes to fonts. There are so many choices, this is tempting:
Practically speaking, though, you will want to pick a solid, simple typeface and stick with it. (Maybe two, if you’re daring.)
Most typefaces can be stuck into a few categories: serif fonts, which have little “tails” emerging from letters (e.g., Times New Roman, Caslon, Baskerville, Georgia) and sans serif fonts, which lack them (e.g., Helvetica, Arial, Futura). Below is a close-up comparison of a serif font vs a sans serif font:
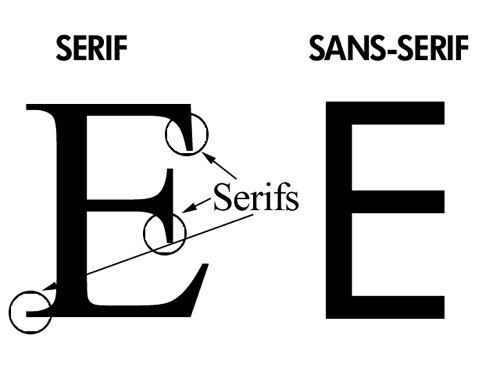
Generally, sans serif fonts perform slightly better on posters. They tend to be slightly more readable from a distance. A few examples of sans serif fonts that have proven themselves time and time again as “can’t miss classics” include Helvetica, Gill Sans, Verdana, FF Din, and Unica.
If you are feeling adventurous, you can use two fonts on your poster. Many designers who go this route will choose a classic serif font (e.g., Times New Roman) for the paragraph text and will choose a sans serif font for the headings. This is a classic pairing and is hard to get wrong, but pay close attention to the letterforms of both typefaces. Exaggerated heights, curves, and shape could create a clash between the fonts that you’ve chosen and could detract from your poster. To see how professionals do it, visit several websites and look at how their pair fonts for their headings and body text.
If picking two fonts seems too daunting, choose a typeface that is very robust. For instance Myriad Pro (the default font when writing text in Adobe Illustrator) comes in Light, Regular, Semibold, Bold, and Italics versions of each weight. Having a variety of weights (the font boldness) allows your poster design to remain consistent, while also giving you a variety to work with. Here are a few fonts that will work great on your poster that have a large amount of weights to play with and come by default in Adobe Illustrator:
- Myriad Pro (12 weights)
- Helvetica Neue (14 weights)
- Avenir (12 weights) or Avenir Next (12 weights)
- A great font, but you’ll need to download this one: Open Sans and Open Sans Condensed (combined 13 weights).
Choosing your typeface
There are a few ways to check whether a particular font will do the job on your poster. If you haven’t written all the text, take a representative sentence – either from your own work, or a similar paper in the field – paste it into a word processor or slide software, and see how it looks. Put several side by side to compare.
Don’t use “Lorem ipsum” or other placeholder text for this test. You want to see how the technical words, specific to your field, look in the different letterforms!
Here’s one example.
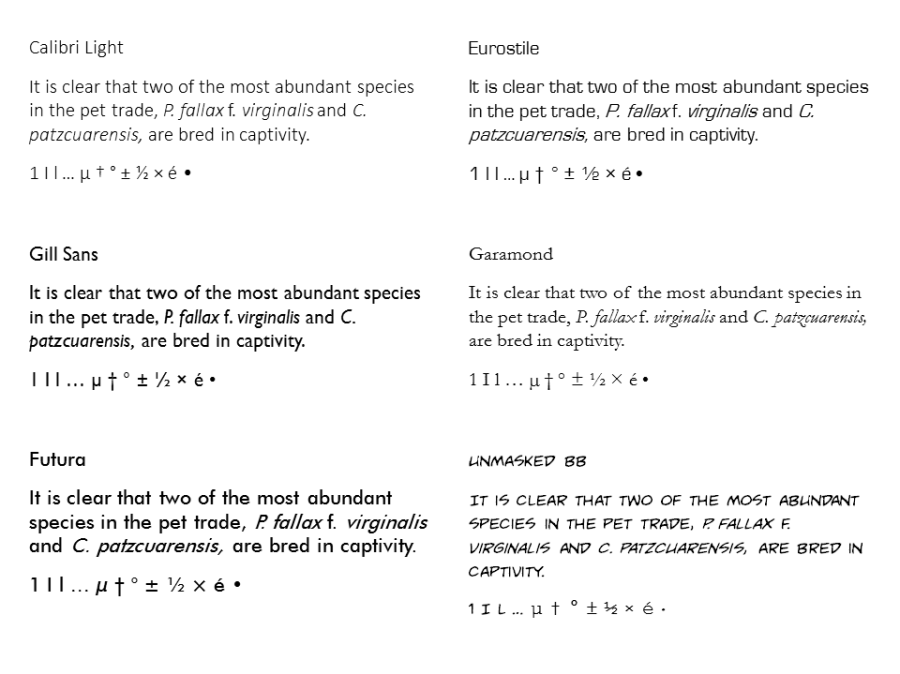
Some features only become obvious when you see the text in sentences, rather than single words. For instance, in this example, Eurostile has some uneven spacing when it transitions between regular and italics. If a poster needs italics, such as species names, Eurostile might be more trouble than it’s worth.
Each of these samples has a distinct feel, even though they all show the same text. In fact, all of these were set to the same point size and spacing. Even though the height of the text should be the same in theory, this almost never holds up in practice. Here’s an even more striking example:
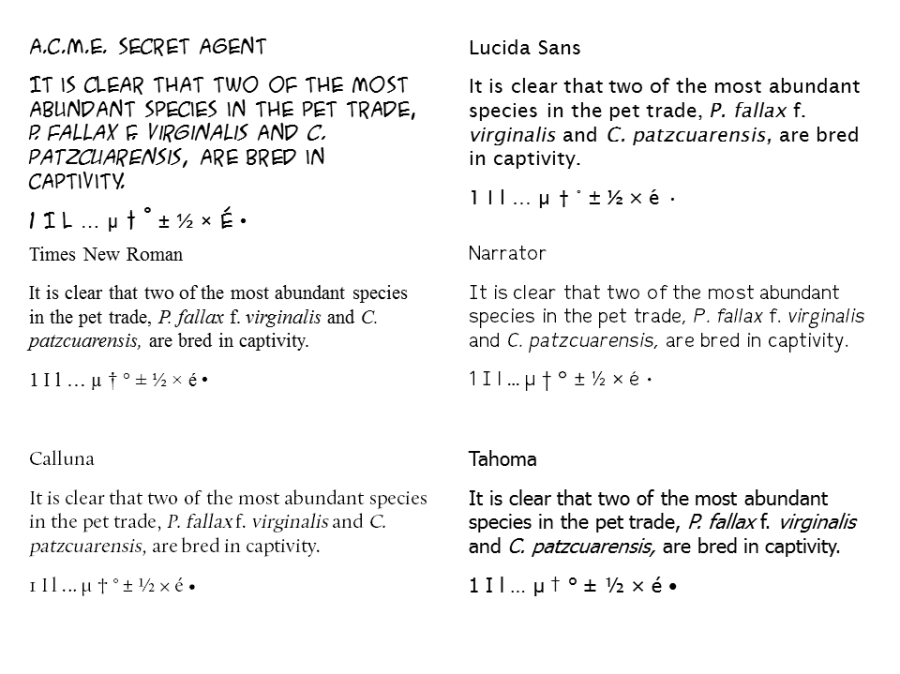
A.C.M.E. Secret Agent is taking up more space vertically than any of the others, even though they are all the same point size.
Many typefaces come in a much wider variety of weights and styles than are installed on your computer by default. Further, many companies make different versions of the same classic fonts; some may support more of the seldom used characters than others. Splurging to buy a fully loaded, professional font package can be expensive, but it does give you a great toolkit to work with.
P.S.– No Comic Sans.
Special considerations for special characters
Scientific text has higher demands than an email or newspaper article. You often need italics, superscripts, subscripts, mathematical formulae, Greek letters, and so on.
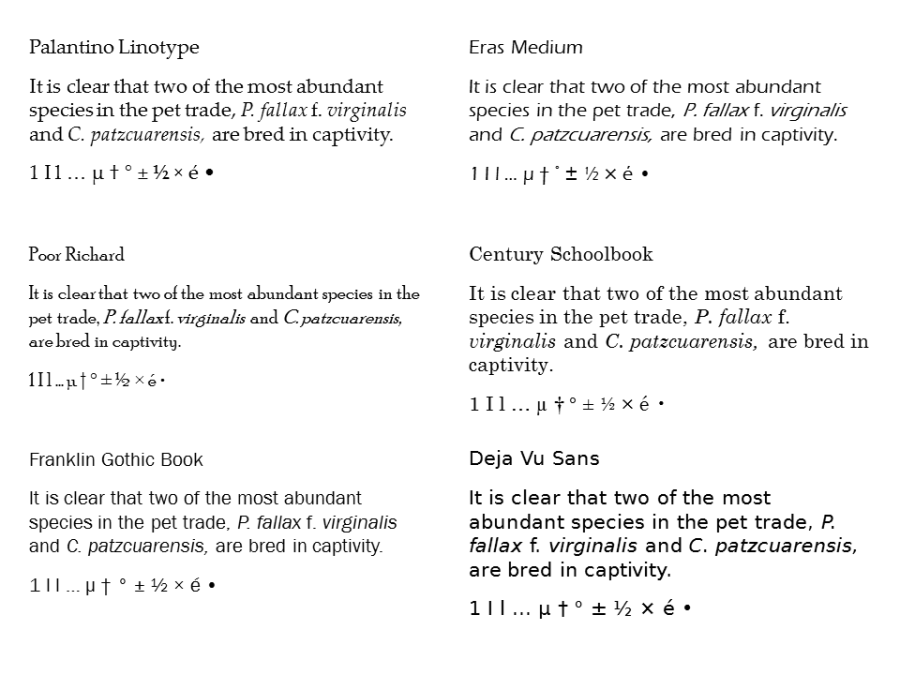
The last row contains two useful tests for many fonts. It starts with:
- The number one.
- An uppercase letter I.
- A lowercase letter L.
In Gill Sans, these three characters are identical. Few of the examples here a good job of distinguishing the one and lowercase L. Look for typefaces that distinguish three characters to help make the text more readable and reduce confusion.
The special characters on the last line are another important test. Fonts differ tremendously in their support for special characters. For example, in A.C.M.E. Secret Agent, the Greek letter mu (the micro symbol) and some of the other special characters don’t match the hand-drawn appearance of the rest of the text. Some fonts won’t have any of these extended characters, particularly free ones available on the Internet.
 Remember all your figures that you worked on last week? Once you have picked your font for the main body of your text, go back and make sure you’re using the same font on all your figures. You do not want to have a sans serif font for your main text, then serif fonts for your figure legends or tables.
Size
The burning question for a lot of people is, “What’s the minimum point size I should have on my poster?” Because of the variation in the typefaces (on display in the samples in this post), there is no exact answer for that question. There is just the blindingly obvious guideline that bigger is better.
For example, Garamond is an excellent typeface for books, which are meant to be read at a short distance. It is quite a light typeface however, with lots of thin lines, so you may need to set it in a larger point size than others to keep it readable at a distance on a poster.
As we said earlier this post, typesetting is a craft, not a precise science. The best way to tell if the text is too small is to print samples of the smallest text you expect them to be on your poster, put them on the wall, take a few steps back, and try to read them. Then, get someone down the hall to try to read it. Try different fonts. Repeat until you’re happy.
Fine tuning text
Many of the typefaces above, and many more besides, could be used for the main text on a poster. Some may need a little finessing to look their best, though.
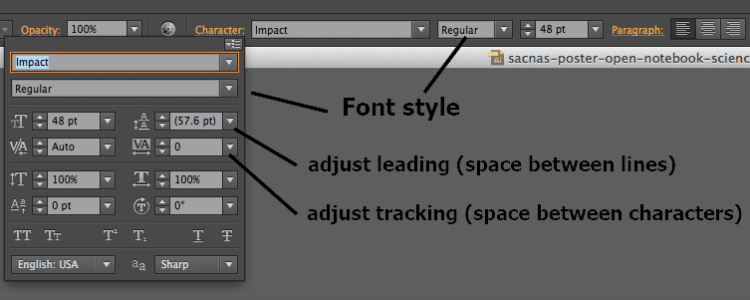
The default text spacing between lines (a.k.a. leading; rhymes with sledding) may be fine for an essay, but can be a little too close for posters. Try increasing the vertical space between each line. For very large text, like the title, you may also want to increase the horizontal space between the letter, too. The controls for both can be found in Illustrator under the “Character” pop-up panel:
You might also need to adjust for the particular typeface you have picked. Palantino Linotype, for example, may need some more spacing between the lines for maximum visibility.
Another consideration is whether to justify the text or not. Justification can look sharp, because it emphasizes when text is well aligned on a grid. Justified text often ends up with large spaces between words (called “rivers”), unless you are willing to put time into fine-tuning the spacing with hyphenation. For more on type justification check out Butterick’s Practical Typography.
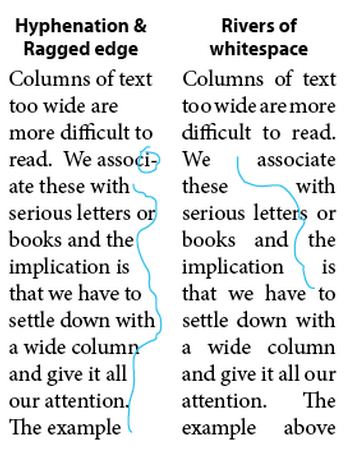
Professional typesetters usually aim for about eleven words per line of text. A thin column might have 6 or 7 words in a line, which means a reader is constantly having to look back and forth. A very wide column might have 20 words in a line, which makes it harder for a reader to find the next line when they get to the end of the one they were reading. As with so many things in typesetting, you need to try it and see.
Poster Color Schemes
By now you’ve no doubt been playing with colors on your poster. In fact, from the moment you input a photograph or figure you have incorporated color. Now that we are adding our copy (the text) we’ll have to tweak our poster colors to ensure maximum readability. For instance, yellow text may look amazing, but on a white background readers will strain their eyes. And we don’t want that.
Just as you will for fonts, you’ll want to choose your colors very carefully and plan a color palette that will be evident throughout your poster. This will help your poster maintain its design consistency. In some cases, you can even use your color palette to guide your reader around your poster. Once again, we’re going to use Anthony’s poster on open notebook science as an example.
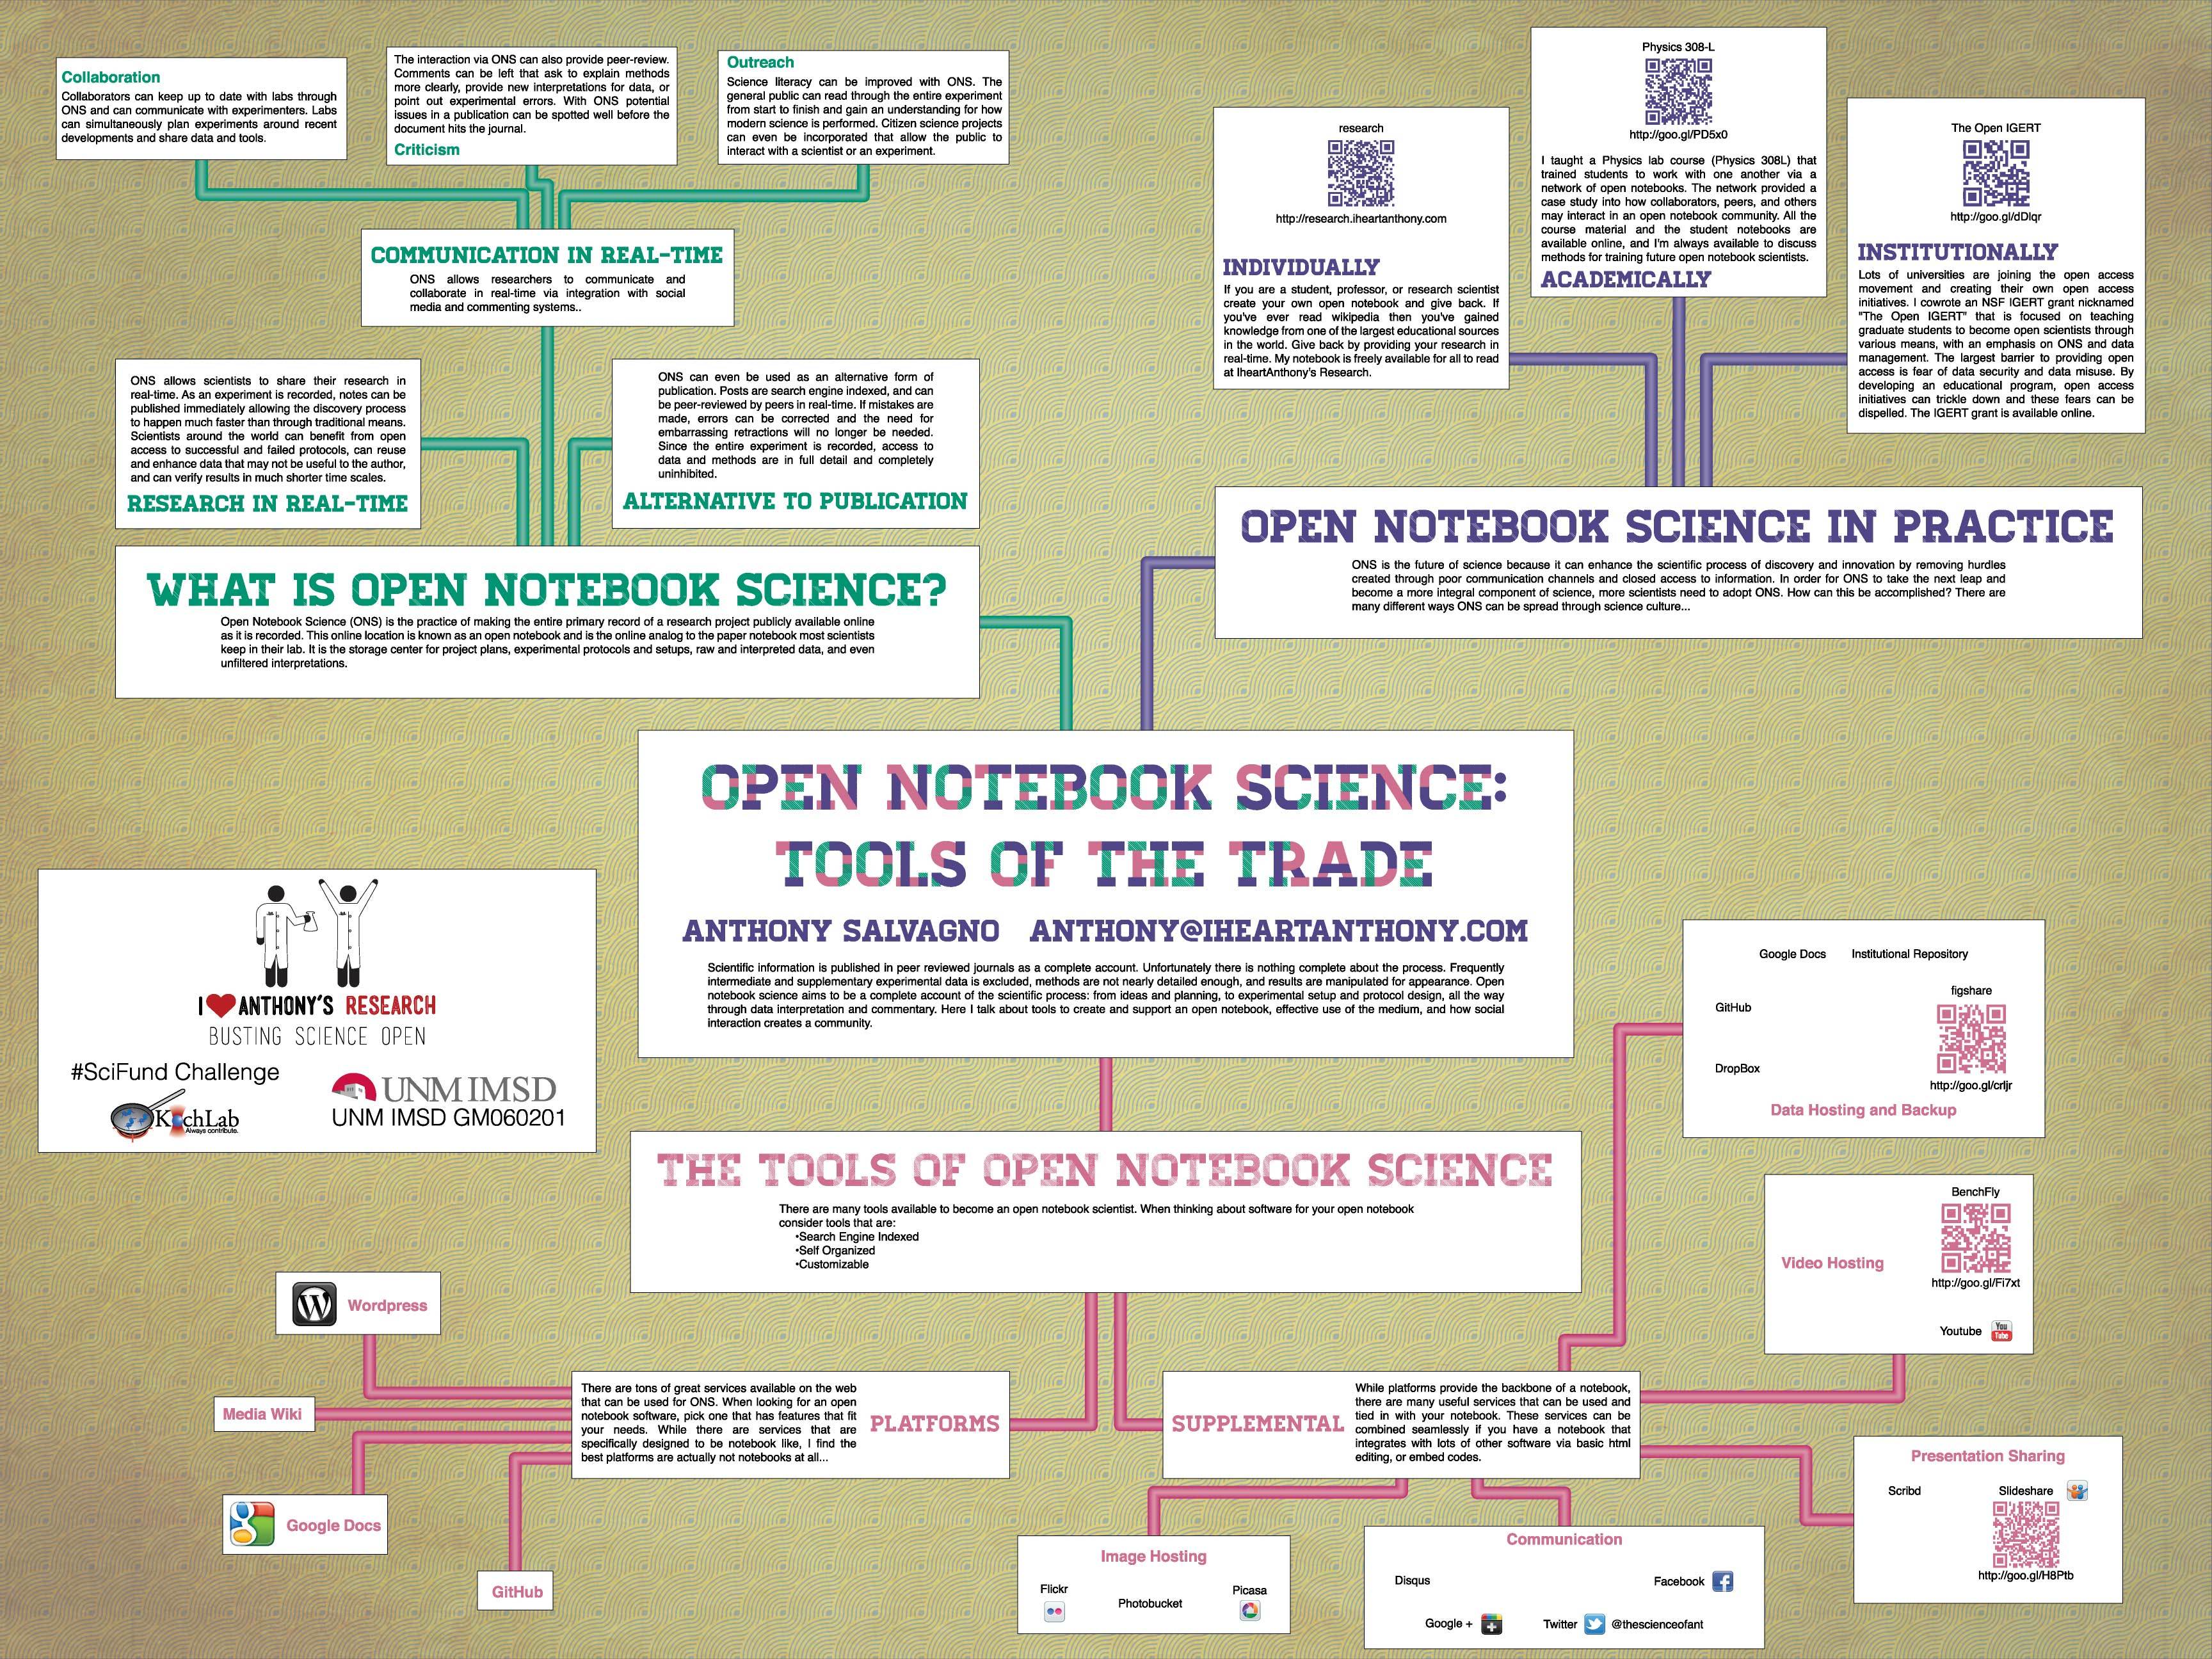
Color Contrast
The first thing you will want to consider when working with color is contrast. The most obvious contrast is black and white. We see it 1000 times a day, and it will be the most stark contrast you can achieve on your poster. Even in a highly colorful design, Anthony utilizes the black-on-white contrast to ensure readability.
But you’ll notice that in the example above, the purple in Anthony contrasts well with the white background. Even more so, the three colors in the T and O also contrast with each other. So how can we use colors to provide contrast?
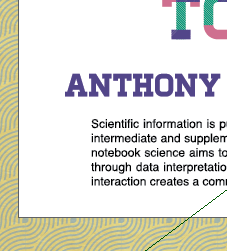
Complementary Colors
Recall the color wheel from our middle and high school art education. Each color on the wheel has an opposite, known as its complement.
These complements provide an inherent contrast when paired. One of the easiest ways to provide contrast (and aesthetic) artistically is to use these complements. For example, Michael Bay abuses the Blue-Orange pairing in his films:
You can even expand your palette from a two color set, to multiples using complements as a basis. You can try color triads (break the wheel into thirds and use corresponding colors in each third), tetrads (fourths), etc. Adobe provides a helpful website that allows you to play with different colour combinations following these sorts of rules.
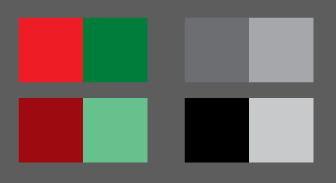
But sometimes it isn’t enough to just use complementary colors to provide contrast. For instance, many people are red-green colorblind. So how can we modify our color choice to provide maximum contrast?
Saturation
Take a look at the image above from Transformers once more. Notice that the orangish car is lighter than the greyed-blue of the sky. One way of thinking of colors is to look at the HSV color space. The HSV (Hue, saturation, value) color space is a cylindrical representation of the color wheel.
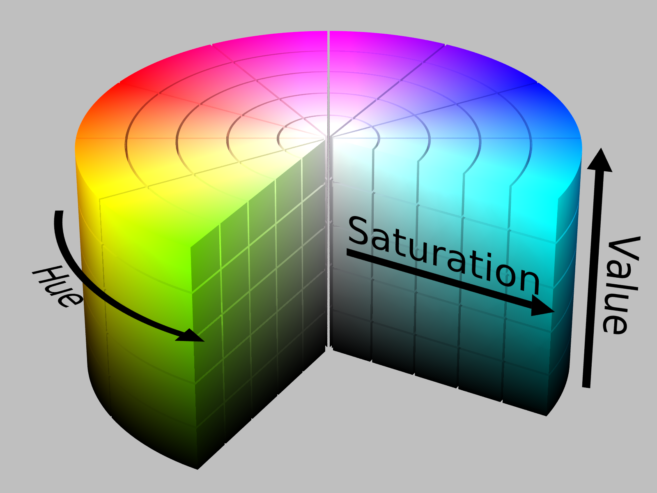
Each hue (or color) of the wheel can be thought of in terms of its own color intensity (from white to full color) and blackness. By adjusting the saturation and value you can enhance the contrast between two colors. For example, when dealing with red-green colorblindness you could change the saturation of the green to be less saturated (more white) and adjust the value of the red to be darker:
Picking your color palette
For Anthony’s open notebook poster, he combined a few of these principles to create his color palette. Looking at the colors in the title, you can see a slightly altered color triad.
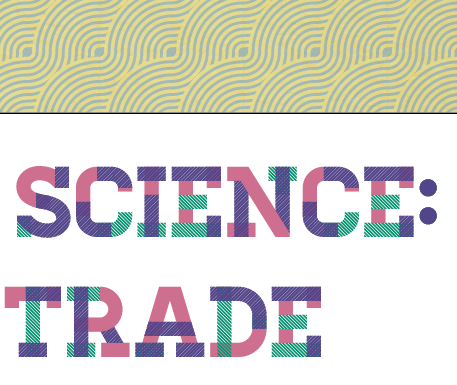
The triad is built around the purple, with the saturation of the pink and turquoise altered slightly to provide better contrast against lighter backgrounds, but not so much that they are indistinguishable from each other.
Additionally, the yellowish hue in the textured background forms a tetrad with the other colors. The texture pattern itself (the grayish-blue) is complementary to the yellow. To further distinguish these elements, the saturation of both colors was reduced (lightened) so that they would contrast with color pipes and the text box elements.
This is just one method of choosing your color palette. There are many different paths you can take. Another method may be to use a photo or figure in your poster as inspiration, and choose a color scheme from that.
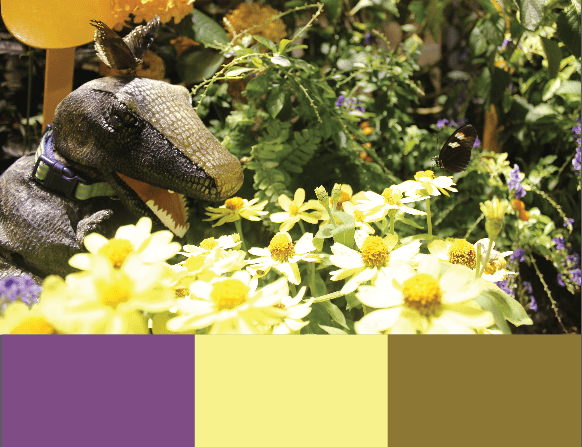
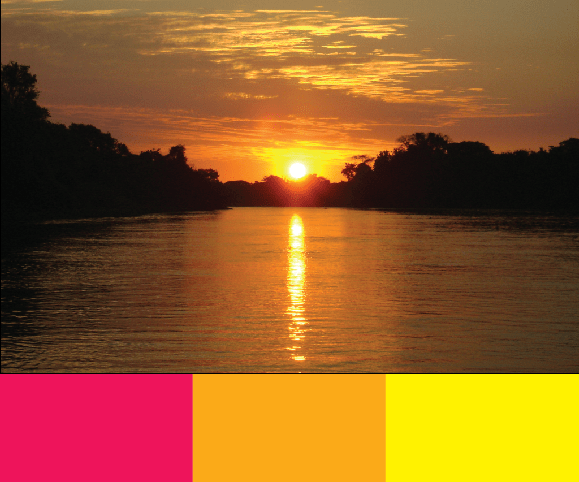
Or instead of picking colors straight from the photo, you may choose colors based on colors from the photo that may be more appealing. For instance, you have an image of a sunset over a river and you’d like your colors to be inspired by the sunset as shown below:
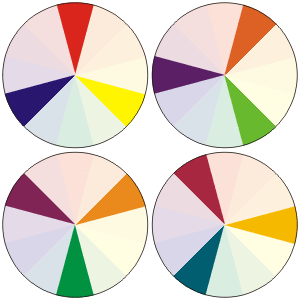
In a more general sense, you can even choose a palette that reminds you subconsciously of the topic at hand. For instance, you poster is on astronomical research, so you could pick colors that represent deep space objects. In the below example, such colors were chosen with this topic in mind, with shapes sized to demonstrate proportion of color to be used.

Monochromatic color palettes consist of mostly one color or a few colors that are very near in hue but could have a wide range in saturation. The change in saturation is where much of the color contrast comes from. Below is a great example of a monochromatic design built around 3 colors; red, orange and yellow.

Check out this gallery for some great examples of monochrome color usage.
There is a lot to consider when choosing your color palette. It may be difficult to pick colors out of thin air, so picking a color based on an image or theme (your take home message) from your poster will aid greatly. Even still, finding the right shade of a color can be challenging. We can use Illustrator (see below) to help us pick colors. Additionally, the site Colour Lovers is extremely handy to identify color palettes based on your needs. You can search for palettes and results can demonstrate what the proportion of intended color usage is.
To help prevent going color crazy, it is best to stick with a very limited color palette. You may have noticed that many of the examples used here have a color palette of three or four colors. By limiting your color choices you prevent your reader from feeling overwhelmed which can drive them away. And, in fitting with the rest of the class, less is more. Having a limited, but well designed, color palette can be provide the impact that you desire.
Implementing color in your poster
Once you pick your palette, you can then begin to put the colors in your poster. From your color palette, you will want to identify your primary color. That is, the color that will be most prominently featured in your poster. This could be seen in your background, headers, photos, text box backgrounds, etc.
From there, you will want to identify which color will be used in which proportion. These proportions will be based on a number of things including where these colors are places, which colors come in contact, where greatest contrast will need to be, personal opinion, etc.
You may want your darkest color to be your most used color, for example using it as your background. Then your lightest color should be the next most used color to provide contrast, ie your text. The below example uses the astronomy influenced color palette from above to demonstrate using a 3 color palette in these proportions. The third color, yellow, is used sparingly for headers and possible figures.

Looking back at the open notebook poster, the colors are used almost evenly. In this example, the colors delineate sections of similar ideas. The font choice (Homestead, which allows for a tri-color scheme) helps to reinforce this concept, and the pipe design combined with the colors gives an inherent reading direction.

Using color is a great way to subconsciously, but directly, guide your reader around your poster or break it into sections. If you choose to use color in this way, it is a good idea to inform your reader immediately. This is done in the open notebook poster by incorporating all three colors in the title and then using the colors immediately in their individual sections. In any poster this can be accomplished by indicating your color usage as soon as possible, preferably where you reader will start their poster journey.
Manipulating Text and Color in Adobe Illustrator
Working with text
Adobe Illustrator is a very powerful graphic editor, but conversely it is a very poor text editor. It will be easier to prepare and edit your text in a word processor first. There is no spell check in Illustrator, it isn’t very easy to make a list, and you will need to work in sections. So it is best to make sure that everything is mostly prepared somewhere else first and then copy and paste your text into Illustrator.
We’ve already done a little bit with text. So let’s go a little bit further. One of the most time consuming aspects of finalizing your design will be working with your text. And picking your font can be very time consuming. Luckily, Adobe Illustrator comes with some great font packages right from the start. Earlier we suggested some font packages that are very robust. Using one of these for your copy (your main text) will help you save a lot of time in choosing a font, because these are the tried and true fonts. For reference, we suggest:
- Myriad Pro
- Helvetica or Helvetica Neue
- Avenir or Avenir Next
- Open Sans (must download and install, see below for instructions)
You may want to get a bit more stylized for your headings and title. The easiest way is to adjust the Character settings and font style (weight, italics, etc). And altering these properties can have a very impactful result.
Alternatively, you may want to use a more stylized font. Again, Illustrator comes packed with tons of different font choices. From the Type menu, you can navigate to Font to see a preview of every font your computer has installed.
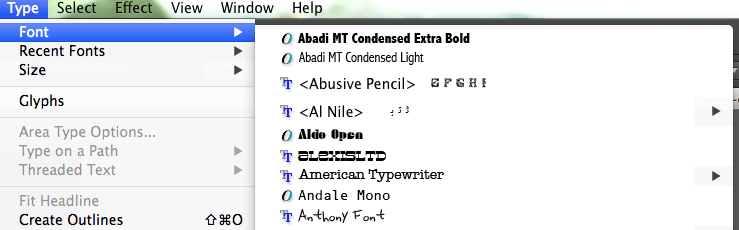
With your text selected, navigate to Type > Font to select the font you wish to apply to your text.
You may even have special characters that you wish to use, or suppose you want a bulleted list. Illustrator won’t generate these automatically. To find these characters, you’ll need to navigate to Type > Glyphs.
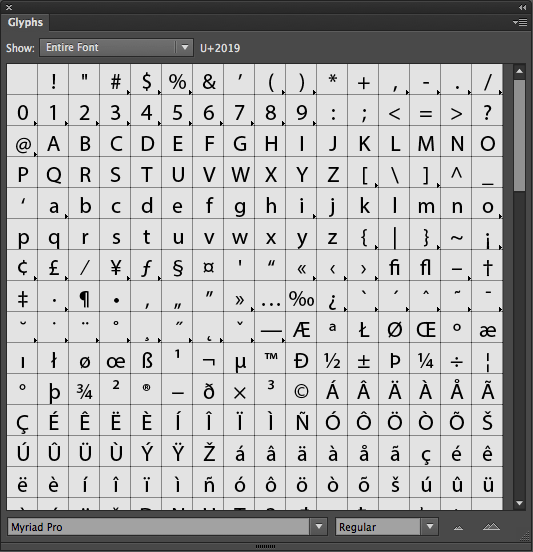
You’ll see a pop-up window, which will default to show you ever character in the typeface. With your Type Tool, click the text you are editing and then double click a character in the Glyph pop-up to insert the character in your text.
BE CAREFUL: Not every font will have every character. In fact, a lot of the very stylized fonts will only have the basic alphabet and maybe a few alternate characters. For instance, some fonts are only numbers, some are only icons, etc.
Use your best discretion when choosing a stylized font. A lot of times you will like a font based on what you are seeing in the demo, but when you put it in your poster you’ll notice some discrepancies that make your font a poor choice. With that said, here are some great places to download fonts for free:
- Lost Type Co-op – every font here is high quality, but very context specific.
- Da Font – updated very frequently and has a huge catalog of fonts, several of which may not be the best quality.
- Font Squirrel – another site with hundreds of free fonts.
- 101 Best Logo Fonts – any fonts from this list could be used as a title font in the right poster.
Working with color
While Illustrator is limited in working with text, it is very powerful when working with colors. You can pull colors from photos, figures, and objects. Illustrator can even create color palettes based on color theory rules like complementarity, analogues, triads, tetrads, etc.
Navigate to the Window menu and open the Color, Color Guide, and Swatches panels.
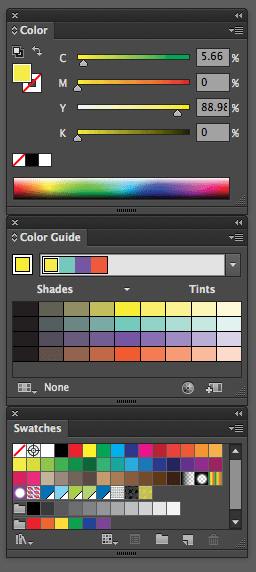
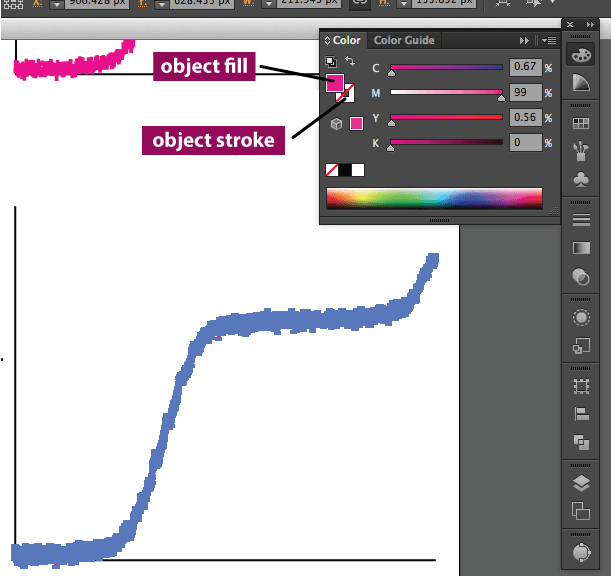
From these windows you can do almost everything you could want with color. The Color panel allows you to edit the color of a selected object directly. Recall from last week that you can edit the stroke and fill of an object. You can either type the percentage of color in the boxes, or use the sliders to adjust the percentage of color. While your object is selected, you can also just click the color bar at the bottom of the color window to pick that color. Remember: to edit the color of the object fill, you will need to click the object fill box. To edit the object stroke (the outline) click the object stroke box.
Aside about text color: You can edit the color of your text as well. Text color is only fill. There are very few instances where you will need to apply a stroke color to your text, so avoid this if possible. Additionally, you will want to make sure your text contrasts greatly with its surrounding color. Stick with white and black for text fill. For dark backgrounds use white, and for light backgrounds use black text.
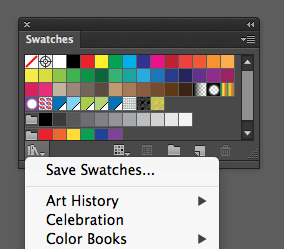
The Swatches panel contains a lot of preloaded color choices. At the bottom of the panel there is an icon that looks like a set of books, which will allow you to view the entire library of swatches.
You can even create your own color swatches to store in the swatches panel. Select an object that contains the color properties that you would like to save. Click and drag that object into the swatches panel and, poof, new swatch! To use any swatch, just select an object whose properties you would like to change and click the swatch you desire. The color properties of the swatch will be applied to your selected object.
If your color is trapped in a raster image, like a photo for instance, you can apply colors from anywhere in the photo to a vector object. With the photo placed in Illustrator (File > Place), you can use the Eyedropper Tool (or press i on your keyboard) to apply colors to any object.
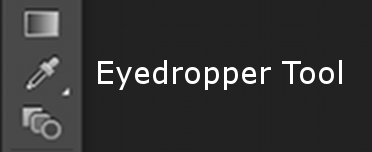
First select an object whose color you would like to change. Next select the Eyedropper Tool and click the color in the photo that you would like to extract. Your selected object will have the color from the exact place you clicked in the photo.
You can then place this color in the Swatches panel, by dragging the object into it.
Now let’s move on to the Color Guide panel. The Color Guide Panel will suggest colors to you based on a selected color. In the below example, I’m using a yellow object as my base color in the color guide.
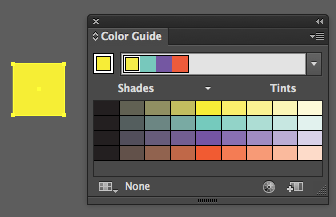
By default, the color guide will show me different shades for the selected color (top row). In this particular case, it is also showing shades for complements in a color tetrad. You can change this by clicking the drop down bar near the top.
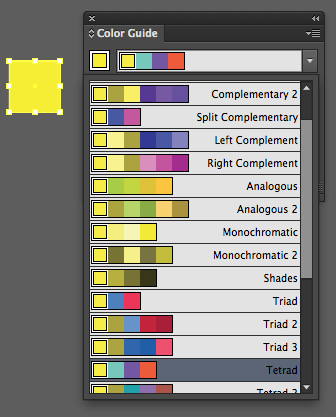
From here, Illustrator will suggest color palettes based on various rules of color theory (which we have gone a little into in the color section of this post). Pick one of the color rules to then select colors for your poster objects. For this example, Complementary 2 was chosen and a second object was created.

To edit the color of an object based on your color rule, just select your object, and then click the color you would like to apply. In this example the first hue of violet was chosen. Notice that your color palette will not change when a different object is selected. In order to change the palette based on your selected rule, you will need to change your base color by clicking the highlighted box, as shown below.
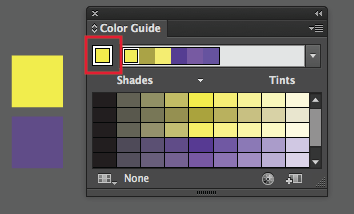
Clicking that box will change the base color of the palette to your selected color to fit the harmony rules that you selected.
Try playing with the Color Guide to help create the color palette for your poster. If you feel adventurous, create a palette based on the palettes from Colour Lovers, or Place an inspiring image onto your artboard and select colors from that.
Remember also that your figures should be consistent with your color palette, so once you have your poster colors, recolor your figure to match. Or base your poster colors on colors from your figure.
Assignments
- Fill out your wireframes with text and your figures (if you haven’t already). By this point, most of your poster content should be in your wireframe.
- Pick your poster font choice and apply that to your poster. If you need to, tweak your font to work in your poster. Remember to try different weights for headings and your title if you are going with one font throughout your poster.
- Work on your color palette and apply the colors to your poster. Make sure that your figures fit your color palette. Remember, everything in your poster should be consistent. Having colors in figures that clash with your poster colors will disrupt this consistency and will have a negative impact on your presentation.
- Upload your poster to the Google+ Community under Week 4 Assignments.
- In your Google+ post, tell us who your audience is.
- Also provide a word count of your poster.
- Provide feedback on posters from your classmates. This will be an iterative process from here on out. As you receive feedback you may be making major changes to your poster design (colors, fonts, figures, text, etc), but don’t worry, you’ll have plenty of time to perfect your poster over the next two weeks.
1 comment on “Poster Class 2015: Week 4”Add yours →
Comments are closed. You can not add new comments.