Welcome to week 4 of the SciFund Challenge outreach training class for scientists! Last week we focused on delivering our message through blogging. This week we’re going to jump right into the deep end and have you work on public speaking. We are going to use a very specific format called an Ignite talk. Before we go any further, a big tip of the hat to microbiologist Dr. Siouxsie Wiles, who developed the material for this week’s exercise.
This week’s exercise has five parts:
Part 1: Watch a few Ignite talks.
Part 2: Prepare an Ignite talk.
Part 3: Practice your Ignite talk with a class partner.
Part 4: Talk about the experience of preparing and delivering your Ignite talk in group discussion sections
Part 5: Keep going with Twitter.
First off, let me start by saying: Don’t panic!
Preparing talks is usually a very time consuming affair for scientists. This exercise is not like that in any way.
So what is an Ignite talk? Ignite events are organised by volunteers and give participants the opportunity to talk to the public about something they are really passionate about. The catch is, they only have 5 minutes to do it in! Ignite’s motto is: “enlighten us, but make it quick”! Each participant brings 20 slides to accompany their talk; each slide advances every 15 seconds, whether the speaker is ready or not! This is what makes the format so challenging but rewarding.
Part 0: Finding a partner
We’ll be working with a class partner this week. On the Google+ page for the class, under the category of “Week 4”, you’ll find a table where you can find other class participants to partner with. Sign up on the table before doing anything else, as it may take a little bit for you and a partner to connect.
Part 1: Getting started with the Ignite format
Start by watching a few Ignite talks.
I really like Hillel Cooperman’s Ignite talk on Lego and Dianne Stronks one on smiling. And here is microbiologist Dr.Siouxsie Wiles, cheating a little doing a related format called PechaKucha where you get 20 slides for 20 seconds (so a whole 1 minute 40 seconds extra), but you get the idea.
Part 2: Preparing an Ignite talk
Think of an Ignite talk as a 5 minute monologue with timed visuals. To prepare your talk you will need to decide on a topic, prepare your 20 slides/images,and then map out what you are going to say to accompany each slide. Again, don’t worry: you can do this exercise in a relatively short period of time.
As always with science communication, the first task in this exercise is for you to identify your audience. The more specific you can envision your audience, the better.
Once that is done. start by watching the following great Ignite talk on how to give an Ignite talk by Scott Berkun, while Cory Forsyth also has some great tips:
Choose your slides carefully. They can be informative (but avoid long quotes and complex diagrams), symbolic (back up the point you’re making) or decorative (an attractive screen to speak in front of). Try to avoid the situation where you’re trying to explain the slide, as that eats up your 15 seconds really quickly. Last but not least, be creative. 15 seconds per slide equals about 2-3 sentences, depending on how fast you gabble! If needed you can duplicate a slide (so the same image is on screen for 30 seconds).
Let me repeat, don’t panic! And don’t spend a week trying to get your slides together. You can do that when you do one for real!
To save preparation time, don’t write out a speech for your talk. At most, write out a word or phrase per slide to remind you of your points. This actually will make for a better presentation anyway, as hearing someone read a written speech is usually rather excruciating (written speech is very different than spoken speech, a point often forgotten by speakers).
Whatever program you use to prepare your slides, please save your file in Powerpoint format and be sure that your files don’t contain animations (read on to learn why).
Part 3: Getting some practice
Don’t worry, we aren’t going to insist you go out and give a real Ignite talk, but trying it with an audience is best. So, for part three of this week, we’ll be pairing off with another class participant to practice our talks. If you haven’t done so already, on the Google+ page for the class, under the category of “Week 4”, you’ll find a table where you can find other class participants to partner with. Try to find a partner who is not in your field. By Friday, please connect on your own with your partner to do your Ignite talks with each other, via Google Hangouts.
But how do you share your slides with each other on Google Hangouts? Read on!
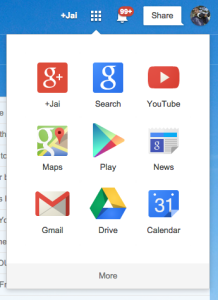
1. The first step is to upload your Powerpoint file to Google Drive, which is Google’s version of online storage. But how do you get to Google Drive? Here’s one way. If you open your gmail account in a browser, the top left of the screen should something like the picture below (minus the big white box below the grid icon). If you click on the icon though, the white box should open up. Among the icons, you will find Drive. Click on the Drive icon.

2. Now that you are in Google Drive (see picture below), click the white arrow in the red box (upper left of your screen) to upload your presentation. Once your presentation is uploaded, click the box to the left of the file name (again, see picture). Press the More button at the top of the screen (also in picture), followed by “Open with” > “Google Slides”.

3. Your presentation should open in a new tab or window, within Google Slides. Under the File menu of Google Slides, click “Publish to the web…”.
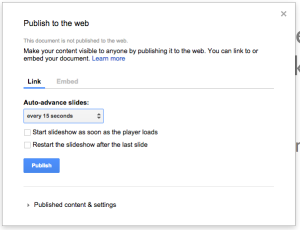
4. In the “Publish to web” box that opens (see picture below), select “every 15 seconds” in the “Auto-advance slides:” box. Click the blue Publish button.

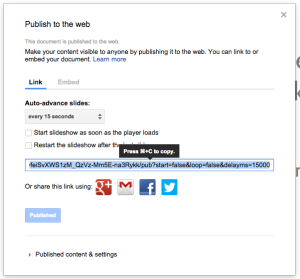
5. The “Publish to web” box should now show a text box that contains a long web link (see picture below). Copy and paste that link into a new browser window.

6. Your slides should appear in the browser. To play your slides, move your mouse over your slides in the browser window. You should see a series of controls appear in the lower left of the browser window (see picture below). One of those controls is a play button. Press the play button to play your slides. They should auto advance every 15 seconds.

7. When you are in a Google Hangout with your partner, you can present your slides to your partner by sharing your screen (the relevant section in those instructions is “Use the Screenshare app”). You should share just the browser window that contains your slides.
8. When you are listening to your partner’s presentation (and thinking of feedback), keep one question in front of your mind: is this presentation compelling for the intended audience? As before, keep an eye out for for jargon and double-meaning language!
Part 4: Group discussions
Once you and your partner have done your Ignite’s, let’s talk about it! We have scheduled a series of Google Hangouts for facilitated group discussions for the end of this week. You can sign up for a hangout on the Google+ page for the class.
Part 5: Twitter
Let’s keep rolling with Twitter, being sure to use the #SciFund hashtag so we can find your tweets.
Send at least three tweets about the Ignite talks you watch for inspiration.
Send at least three tweets telling us how you found the process of preparing or delivering your Ignite talk.
Where to go next:
If you fancy going out and getting some experience of public speaking, there are plenty of places you can start. Check out your local museum and see if they run a science cafe/cafe scientifique series. Or try local community groups, like Rotary, University of the 3rd Age (U3A) and Zonta. But for a real thrill, check to see if there is a local chapter of Ignite, Pecha Kucha or NerdNite in your town.
Good luck!


1 comment on “2014 Outreach class: week 4”Add yours →
Comments are closed. You can not add new comments.