

Welcome to week 3 of the SciFund Challenge outreach training class for scientists! Last week we focused on crafting our message. This week we’ll develop skills to deliver that message through blogging. This week’s exercise has five parts: A) take a look at a few science blogs, B) write a blog post, C) comment on others’ posts, D) talk about the blogging exercise in a hangout, and E) keep going with Twitter. As a small note, for those of you with your own blog, please do the blog exercise as we suggest and not on your own blog.
1. Scientists are using blogs for a giant variety of purposes, from advancing their research to connecting to the public with their science. It is impossible to give an exhaustive list of everything that scientists are doing with blogs, but following are a few very different kinds of science blogs (ordered from most technical to least). Please take a glance at the following to see some of what can be done with the format.
- Statistics and programming blogs: R-bloggers (aggregator of R blogs), Cross Validated (stats stuff, not precisely a blog)
- Blogs focussed on researchers within the blogger’s field: Dynamic Ecology (ecology stuff), Research Blogging (aggregator of generally technical discussions of the scientific literature)
- Outreach-oriented blogs: Deep Sea News (marine biology), Bad Astronomy (astronomy mostly), Scientific American (lots of specific blogs to choose from here)
2. This week you will be given access to a private blog, hosted by SciFund Challenge, so you can get started with blogging. Only people in the class have access to this blog and, when the class is over, all materials you write on the blog will be erased (to ease the minds of first-time bloggers). This SciFund blog runs on WordPress, which is the most widely-used blogging system. The blog is Practice Blog 1 (please click on the link).
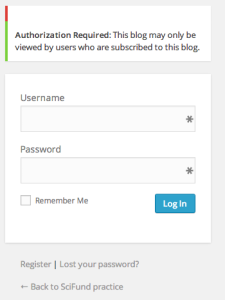
3. The first time you do click on the link, you’ll see the screen shown below (if you click on the image, you’ll see a larger version). Click on Register in the lower left and sign up for a SciFund Challenge account on the following screen.
4. Once you have registered, send me an e-mail giving me your username (e-mail: jai.ranganathan@gmail.com). I’ll add you to the list of users on the practice blog and I’ll let you know that I have done so, via e-mail. Additionally, if you forget your password, let me know as I will need to reset it manually (sorry for the clunkiness, some blog issues are in the process of being fixed).
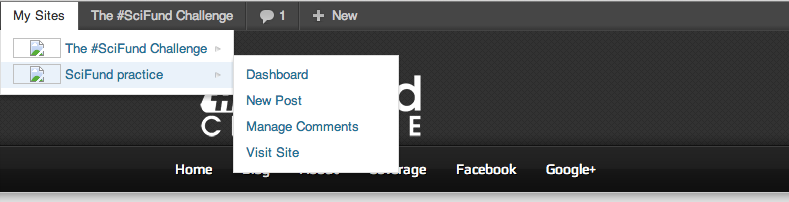
5. Once I have confirmed you, head back to the practice blog. Once you are logged in, the top of your browser should look like the image below (click on image for larger version). In the upper left of the screen, move your mouse over “My Sites” and a menu will drop down. Move your mouse over “SciFund practice” and in the following drop down menu, click on “Visit Site” to view the practice blog.
6. To add your own blog post, move your mouse back over “My Sites”, followed by “SciFund practice”. This time click on “New Post”. The screen that opens up looks like the image below (click image for larger version) and it is here where you will compose your blog post. Writing blog posts in WordPress should seem extremely similar to the word processing software that we use every day. Here is what you need to know.
- You’ll put the post together in the large white rectangle (where in the image below I wrote “Compost post here”). You’ll notice a bunch of icons just above the rectangle, like bold and italic buttons, which work exactly as they do with your word processing program.
- You can add images to your post with the “Add Media” button (number 1 in the image). Although you could add video with this method, you don’t want to do it.
- To link to another web page, select the associated text in your post and hit the Link button (number 2 in the image; note that button is grayed out in image because no text was selected).
- To add YouTube, Vimeo, or other videos, click on the Insert menu (number 3 in the image), followed by “Insert video”. In the box that pops up, type the web address of the video in “Source”. Hit OK.
- To add a title to your post, type it in, in the textbox of that name (number 4 in the image).
- To make it easy for readers to find all posts on the blog on any particular topic, it is really important to add keywords to your post. There is more than one way to add keywords in WordPress and in this exercise, we’ll be using Tags. In the Tags box (number 5 in the image, write down a few keywords for your post.
- To see what your post would look like, if it were live, you can hit the Preview button (number 6 in the image).
- When you are done with your post hit the Publish button (number 7 in the image).

6. Here’s the blog writing exercise for the week. Using one of the message boxes that you developed last week, write an outreach-oriented blog post that involves some aspect of your research or your scientific field.
- Have fun with this! You are passionate about your message and you want other to be as well.
- Start by writing a descriptive title. Good titles are a big help in helping people identify your message on search engines and if you share your story via social media.
- At the top of the post, write a short description of your intended audience.
- Aim for roughly 400-500 words for your post.
- Include at least one link to another web page.
- Include at least one YouTube or Vimeo video.
- Include at least one image.
- Remember to fill in a few keywords in the Tags box.
- Optional: include a tweet in your post (like the following). Here are instructions.
NASA coverage of the Soyuz coming home has begun. http://t.co/BiIwTb6Iis
— Phil Plait (@BadAstronomer) May 14, 2013
7. Commenting on others’ posts. Once you are done publishing your blog post, read at least 3 other posts by your classmates. When reading, keep the following questions in mind:
- How effective was the post in communicating with the potential audience?
- Does the post contain any jargon or double-meaning language? Keep in mind that what is jargon and double-meaning language to one audience could be perfectly compelling to another audience.
For each of the posts that you read, please provide feedback through the comment box at the bottom of the post. So that everyone can get feedback, please focus your attention on posts that have received fewer comments.
8. On the Google+ page for the class, sign up for a Google hangout for this week. In the discussion sections, we’ll be talking about your experience with blogging.
9. Twitter. Send at least three tweets, using the #SciFund hashtag. Here are two possible topics to tweet about: a) outreach blogs that the class ought to know about or b) thoughts you are having with constructing your post.
10. Optional exercise. For those who are looking for more, read the PLOS Biology journal article An Introduction to Social Media for Scientists. This incredible article came out last year and we’ll be talking about it the days to come.
Hi there – I’ve been blogging for a little while now, link above. Advice for a bit more advanced outreach? E.g. increasing readership of the blog. thanks
There is a lot to say about building readership! Jump into one of my discussion groups this week and we can talk about it.
A couple of quick suggestions:
* Publicize your posts. That means tweeting them, putting them on G+ and Facebook. And don’t be scared to tweet that post multiple times!
* Check that your posts on aggregated on http://scienceseeker.org/.
I found that composing directly through WordPress to be quite buggy, sometimes I would even lose whole paragraphs that couldn’t be retrieved. I would suggest composing the text in a normal text editor and copying to WordPress so you don’t risk losing your work!