#SciFund Challenge Class
Part 16: The Final Cut
You can consider the final cut of your video to be - not surprisingly - its final version. Going from a rough cut to a final cut is all about making the final polishing touches that will make your video stand out. We should mention that, before you start on your final cut, you should be happy with your rough cut first. If you make your rough cut as good as it can be, before applying the polishing touches, the less likely you are to have to repeat any work. Here is a list of things you should be happy with before moving on to your final cut:
- Overall Story – You should be happy with the following elements of your story:
- Your written script – Is it engaging?
- The final recording of your script – Are you clear? Did you use the lapel mic to record it?
- Your choice in music – Does it resonate with the emotions you want?
- The visual elements you have chosen to illustrate your story -Are they relevant and engaging?
- Visual Content – All the visual content in the video should be in its final place. Placeholders and text cards reminding you what is meant to go in a place should have be replaced by the real thing. We can do some things to enhance these visual elements later.
- Timing – The precise timing of your cuts should be final. Make sure the visual flow of your video is working through the process of rough cut and review that we discussed earlier. Feedback from others is critical to this stage, so make sure you have shown your video to at least two other people.
- Audio content – The majority of your audio, like music, script recording, atmospheric sound, and sound effects should be on the timeline. We still have an opportunity to add or remove audio if necessary, but the basic audible layout should be there. Don’t worry if you can hear some rough audio transitions - we'll be working on fixing those as part of our final cut tweaks.
Final cut: adjustment one - animating images
Using still images in videos is a great way to illustrate things that you’re trying to get across, especially if there is no equivalent video clip to use instead. However, there are things we can do to make still images a little more eye-catching. In particular, we can use editing software to ‘animate’ images to give them movement on screen. This can be done just to give an engaging and stylish presentation to the images, or the movement can be used to direct the attention of your audience to a particular part of the image. It’s a popular technique used a lot in factual television. In iMovie it is even called the ‘Ken Burns’ effect, after the eponymous filmmaker who has used the technique to great effect. Here's an example of the Ken Burns effect at work (part of his Civil War documentary series).
Here’s how to animate images in HitFilm:
Here’s how to animate images in iMovie:
Final cut: adjustment two - image enhancements
Not all images (still or moving) look as good as others. There are words we can use to describe images and the properties that affect how ‘good’ they look. Earlier in this guide, we talked about several of those properties when shooting footage (like light, contrast, framing, exposure, and composition). All of those properties are best thought about first when shooting your footage. Especially because things like light, composition and large changes exposure are difficult or impossible to change after the fact. When we reach the final cut stage we do have some small amount of control over a limited range of other image properties. These remaining properties should not be thought of as ways to save bad images, but rather as a way we can enhance and improve your visual elements to further the goals of your video. Generally, the properties we can change to enhance images during the final cut stage are:
- Contrast – to change the difference between the lightest and darkest parts of the image
- Saturation – to change the vividness of the colors
- Small exposure adjustments – to bring a little detail out of the shadows/ highlights.
In film making terminology, we adjust these properties of the images in a process called color correction. Video, film, and photographs are representations of reality, but despite our best efforts to represent it as best we can, video above all can suffer from looking very…well, video-like. The main goal of color correction is to get the images looking as close as possible to how we perceive real life. There is also a small amount of creative license in this process that you can use to emphasize or mute certain things and help draw the viewer’s attention towards something on screen. Here’s how you can apply basic color corrections in iMovie and in HitFilm.
Color correction in iMovie
Color correction in HitFilm
Earlier in this guide, we talked about how different types of transitions can alter the mood of your video. Performing some basic visual effects can also help guide the viewer’s emotional reaction and attention towards things on screen. Here are some ideas in iMovie and HitFilm to get you started.
iMovie:
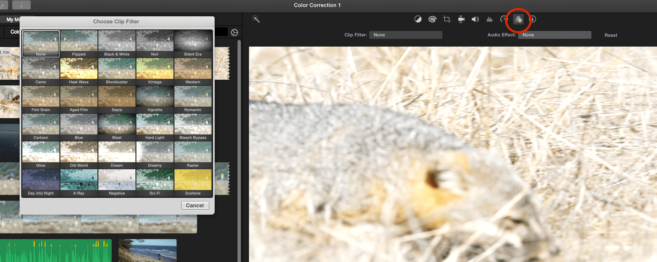
It turns out that iMovie is very limited in the amount and type of effects you can use. There are some preset effects (called filters in iMovie) you can use, found in “clip filter and audio effects” tab above the viewer. Most of them are terrible, with the exception of maybe “Raster” which can be a good way to treat archival television footage in your video.
HitFilm:
HitFilm has nearly limitless ways you can add effects to your video clips by way of using the compositor. Here’s how you can use it to apply two visual effects that help guide your viewer’s attention towards where you want them to look.
Final cut: adjustment three - audio mixing
At the very beginning of this guide (a long time ago, in a galaxy far away), we laid out the basic mechanics of adding sound and adjusting audio levels in iMovie and HitFilm. We'll be building on that here, so just to refresh your memory, here are the two relevant tutorial videos again:
iMovie
HitFilm
These tutorials are great and all (a big high five to your humble guide writers), but they just show you how to adjust sound levels. What about when should you adjust them? And how about why? That’s what this section covers.
As we have mentioned earlier, one of the most important things that music and ambient sound can do is to drive the emotion of your video. It’s a subtle thing actually. If you do your job right, your audience won’t actually remember the sound – it will have strongly influenced them, but it won’t be remembered. What they should remember is your message.
Generally speaking, all of these sounds that aren’t your voice should remain in the background (still acting as a powerful influence), unless you make an intentional choice otherwise. For example, you may make an intentional choice to use an iconic song or to use music in a ironic way, in which case you might want to bring that sound out of the background.
The one ironclad rule is that any added sound should not be competing with someone in the video who is speaking (except for the rare circumstance where this is an intentional choice). In our practice, we generally find that we need to set the background sound level at a slightly lower volume than we usually think. If the volume levels for your added sound are too high, your voice (and your message) will be drowned out. Here’s an example of that:
But it isn’t just loud volumes that can clash with your voice. Certain kinds of sounds or music, even at low sound levels, can strongly compete for your audience’s intention. Any music that contains spoken or sung words is likely to compete with you. Additionally, certain instruments tend to draw attention away from what you have to say (for example, violins). It is difficult to list all the qualities of music or sound that should be avoided, but you’ll know it when you hear it. If you overlay your voice over some sound that sounds even a little clashing, don’t use that sound. See the video below for an example of how hard it is to keep track of someone’s message if clashing music is used.
Most of the time, you’ll don’t want your additional sounds to show up abruptly, as that can be jarring. You’ll want to slowly fade them in and out, so that the sounds don’t call attention to themselves. However, there is an exception to this: if you intentionally want to call attention to a sound that you are incorporating (a knock on the door, a ringing telephone, etc.). Here’s an example of a jarring transition.
And here’s that clip again, with a gradual adjustment in sound levels. Note that the sound transition occurs at a transition point in the message – the change in background sound doesn’t occur at a random place!
There are several reasons that you would want to increase music or ambient sound levels in your audio. The first is that it makes sense to subtly increase levels if there is a stretch where no one is talking. The reason for doing this is to keep the overall volume of your video relatively level, even when all voices have dropped out.
The second reason why you might want to increase the volume is to provide audio punctuation. What is that? You can think of it as a burst of sound that achieves one of three things:
- It adds emphasis to a point that you have just made.
- It illustrates something on the screen.
- It acts as a transition between two shots that have been edited together.
Even though we defined audio punctuation as a burst, you still want to keep it subtle. Here’s an example from a science video created by Vox. In the video, the increase in volume occurs immediately after the hook (roughly 21 seconds into the video) and it is there in order to help illustrate the title slides being shown at that point. The increase lasts for roughly six seconds (the duration of the title slides). As the volume increase is subtle, you’ll have to pay attention to notice it.
It is important to note that audio punctuation only really works if there is something in your selected audio that allows for it. Just increasing the volume at random points of a song won’t really work. Here’s an example with the plover footage, where a specific audio cue in a song (a bell ringing) is used to emphasize a point that is being made.
Final cut: adjustment four - Adding Text (Introductions, Call to Action & Credits)
At the end of your video, it can be good to have a visual call to action, especially if that call to action isn’t included in your script or obvious from the images that you show. The easiest way to do this is to write it in big, bold text at the end of your video. Take some time to choose a nice, legible, non offensive font to communicate this information.
Run through your video and decide if adding text at certain points will help emphasize things, or use text to introduce yourself or other people featured in the video. Check out how the YouTube video by Vox uses text to do these things.
If you have used anything made by other people in your video, now is the time to credit them for the original work. Often the source (where you got the material from) will let you know exactly how they want to be credited in your work. For example, Kevin MacLeod from Incompetech has these instructions on how to credit his music in your work. If the artist/creator hasn’t mentioned how to credit them, then you can often find general guidelines under the relevant license(s) that you’re using the work(s) under.
Here’s a reminder of how to add text in HitFilm, and in iMovie.
HitFilm
iMovie
http://help.apple.com/imovie/mac/10.1/#/mov4d3dce7ba
Final Cut: Exercise - Create Your own
Using the advice that we have given you, create your own final cut. The length of time this will take you is hard to estimate - however, it is a pretty sure bet that the longer you have spent getting your rough cut where you want it, the less time the final cut will take.
Here is a reminder of a few adjustments that you might want to make in your final cut:
- Add animations to visual elements
- Enhance visual elements with color correction if needed
- Mix audio
- Add call to action as text & credits
Like we said at the beginning of these instructions, your humble guides would love to see what you have come up with. Do let us know (and ask questions) here: (Jai: jai@scifund.org, Twitter: @jranganathan; Elliot: elliot@mrlowndes.com, Twitter: @Elliot_Lowndes).