#SciFund Challenge Class
2019 Video Class: Week Two
Welcome to Week Two of SciFund Challenge’s 2016 Video Class for Scientists! Last week, we focused on defining the elements of our story. This week, we’ll be putting them together to come up with our plan for our videos.
Here’s the structure for this week:
- Planning the story for your video
- The secret to good video is audio
- Adding text to your video
- Consolidated to-do list for the week
Important! The first thing you should do is to sign up for a Google Meet video session for this week (the instructions dealing with the mechanics of the video sessions can be found in Week One). Remember, although it would be ideal if you have started work on this week’s assignment before your video sessions, it is only really critical that you have read through the instructions ahead of time.
Here's the calendar of sessions for this week.
PART 1. PLANNING THE STORY FOR YOUR VIDEO
Part 1a. Your Audience Isn’t Paying Attention
One of the biggest mistakes that you can make in your communication is assuming your audience is paying attention. The truth is the reverse: unless you give a strong reason why your audience should pay attention to you, they won’t. And, even during your communication, you’ll have to keep providing reasons why your audience should stay interested. If you don’t, even the most initially-interested audience will wander off. The natural instinct of your audience is to not pay attention.
This isn’t just a science outreach thing – it’s a general human communication thing. Here’s an example. An eminent ecologist once told me how he reviewed graduate school applications. For a given application, he would read the first sentence. If he found that sentence interesting, he would continue – if not, that was the end of the road for that application. This same process would continue for every sentence in the application – the first sentence which lost the attention of this ecologist would be the stopping point for that application.
And it isn’t just senior scientists who are like that: you are too. How many classes and talks have you suffered through, where you could have cared less from the beginning what the speaker was talking about? More than a few, I’m sure. And if you have been to an academic conference, you have certainly had the experience of being stuck in a session with boring speakers, where half the audience was ignoring the talks and checking their email instead. Even with presentations and talks you found initially interesting, I bet that your attention wandered fairly rapidly for most of them.
This inclination to stop paying attention is especially pronounced with online video. After all, there are an infinite number of things that people could be doing online, other than watching your video. If a person in your target audience starts watching your video, the number one job of your video is hold the interest of that person – otherwise he or she will quickly go off to watch their favorite Netflix series. The attention of your audience has to be earned and continue to be earned.
This might seem like long odds. After all, is it even possible to create a video that can compete with all of the distractions out there? The answer is yes. You absolutely can win your audience’s attention. How do you do that? With the story arc.
Part 1b. The Story Arc
When a story succeeds in holding audience members all the way through, there is always one reason why. As the story proceeds, the audience continually wants to know one thing: what happens next? The right story arc is what creates this desire in the audience through the use of dramatic tension. Even in a very short (1 min) video, you can create a captivating story arc.
What happens when your story has no dramatic tension? Let’s look at an example. For any medium that tells a story, like a video, it usually has a very distinct structure, which in its most basic form consists of a beginning, middle, and end.
Just for a moment, imagine that our video is a children’s story book with pictures. The easiest way we can link the beginning, middle, and end together would be with the word “then”. A similar effect can be achieved in video when we present one fact after another, even if the word “then” isn’t said in the audio. It’s like the video version of the word “then”.
In fact, let’s make a short story now:
James felt tired
-then-
James climbed the stairs
-then-
James went to bed
We can actually plot this story on a graph where X is time, and Y is the level of tension for the audience to keep watching.
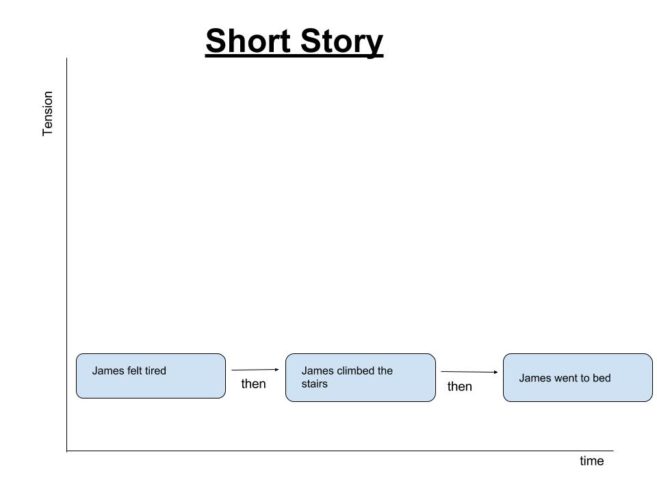
When we use “then”, there is no change in tension, it’s just one fact or event shown after another, the story arc has no arc, It’s a flat line. If you present your audience with a story like this, they will be long gone.
How do we increase dramatic tension? One way is to encounter an obstacle. Let’s put an obstacle in this story:
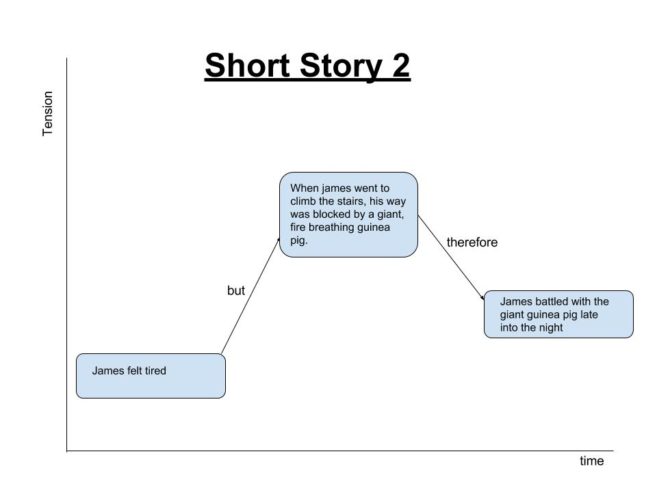
When we put an obstacle in James’ way to reaching his goal, the story gets more interesting. Also notice how the tension level doesn’t return to what it was at the beginning. That’s the tension that your audience might need to do something as a result of watching your video. They want to know more. Does James defeat the guinea pig?
Here’s a real example of highly effective use of dramatic tension: the TV show Breaking Bad. The reason why Breaking Bad makes for such addictive watching is because in each season, every decision a character makes is met with an obstacle. Going back to our story book analogy, the decision and obstacle would be linked with the word “but”.
Now let’s plot the final scene in the Episode “Crawl Space” from Breaking Bad:
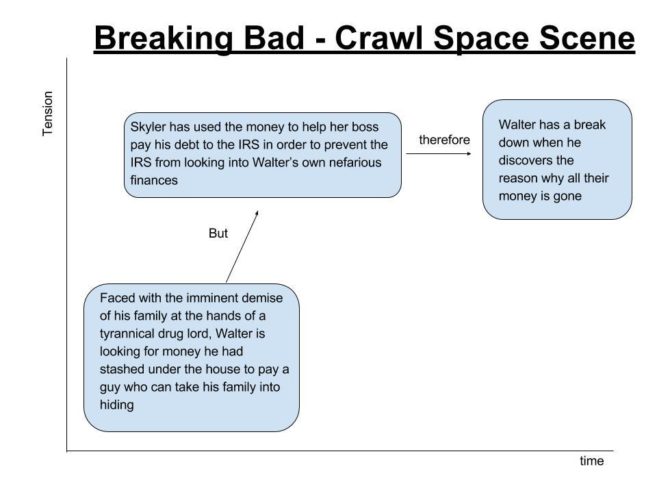
This is a really extreme example, and fictional settings should be easy because the director/screenwriter can dream up obstacles to raise that tension, but the example still works to demonstrate the concept. You can see in this graph how the “but”, that links Walter’s goal with the obstacle, raises the tension in the scene and motivates the viewer to find out how it will be resolved, creating the beginning of a classic story arc. In fact, the scene doesn’t resolve in the episode, creating a cliffhanger.
You can watch that scene here:
In non-fictional stories, we can’t invent obstacles, but we can raise questions, use real-world problems as obstacles, and be provocative. The self-driving DeLorean video (brought up last week) has an arc, but the obstacle has been replaced with a question, a slight sense of mystery, or the unknown:
This example teaches us that science videos can have a story arc too, and that change in tension can come about by using engaging visuals, not just through the script and dialogue. Here, this has been achieved at the expense of information. However, the video certainly inspired many viewers to seek out the project’s web page, where this now-motivated audience could engage with far more information than could ever be provided in a single short video.
Let’s look at a real life example of a flatline story with no dramatic tension: a video that we edited together for the Week Zero exercise. Here’s the video.
Let’s plot the dramatic tension of this video:
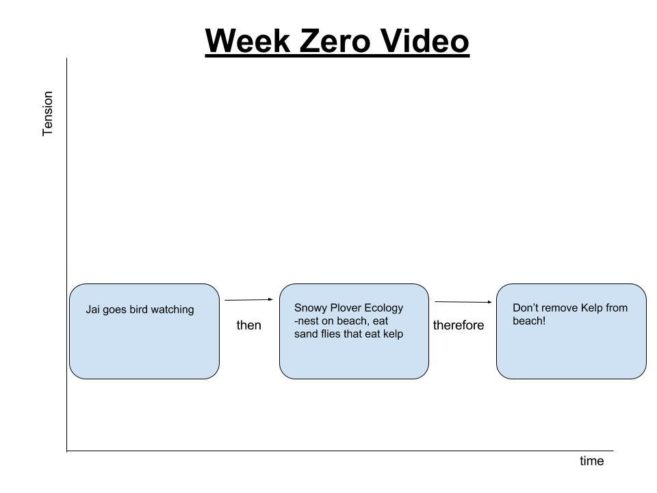
The mildly interesting “therefore” (leading to the third box) might not be noticed or even watched because there is no change in the tension preceding it. This story has no arc to it either. It’s just one fact after another at the same (tensionless level), presented in a boring manner of “and then” followed by “and then” followed by – well you get the idea.
This is actually the tension-free way that most informational videos play out on the web, and on television (and why they are so boring). Stories get a lot more interesting when they can raise that level of tension, and if you can still fit some information in there after you have done that, it’s a bonus.
To show you how to make your video more enticing, here’s an example from Physics Girl:
In this video, she explains the scientific phenomenon related to solar noon. But before she gets into the science, she starts out with a mysterious statement (“I’m relieved I got this footage”), which makes the audience wonder, ‘WHAT footage?”. She shows an image of objects with no shadow, and talks about how eery this looks, piquing the audience’s interest before finally diving into the explanation for how this occurs. It’s not the same kind of tension as Breaking Bad, but it creates an arc to interest your viewers.
Here’s the bottom line for your video: fewer “and then” ideas, more “but this” ideas.
Part 1c. The Hook – The Most Important Part of Your Video
We know that the natural tendency of your audience is to want to run away. As a result it is essential to immediately increase the dramatic tension of your video at the very beginning.
The most critical part of your video is the first few seconds. Let me put it another way. If you do not give your audience an immediate reason to watch your video when they press play, they will follow their natural reaction to flee at maximum speed. This initial part of your video that grabs your audience and tells them “Pay Attention!” – that’s your hook. If you don’t have a solid hook that pulls your audience in, then the rest of your video – however amazing it might be – doesn’t matter.
Your requirement to immediately launch into something that will grab your audience has consequences for your video. The chief consequence is that anything that is not immediately of high interest to your audience can’t be shown at the beginning of your video. Here are just a few things to skip at the beginning (these are frequently seen in science videos):
- An introduction of all of your collaborators
- A lengthy animation of your institution’s logo
- A reciting of your research paper’s lengthy title
- A meandering preamble
So, these are some of the things to avoid. But what should you do? What makes for a great hook? Two things are pretty concrete: the hook should be short (5-10 seconds max for a 1 min video) and immediately tie into things that connect with your audience. Other than that though, it really depends on your audience and what you are trying to do. There are many different kinds of successful hooks and below is a showcase of a few of them.
The following video by Minute Physics, uses a simple question as its hook (hook is just two seconds long).
The video about the Stanford self-driving DeLorean doesn’t say anything at all in the hook (which is about 12 seconds long). It does however have a very strong visual – the DeLorean – that hooks the viewer in. Here’s that video again:
A very different kind of hook can be found in this video reviewing different brands of microphones (11 second hook). The hook is a simple, straightforward, and quick description of the content of the video. The reason that it works in this context is that this YouTube channel focuses on just audio-visual related product reviews. The audience for this channel is a self-selected group of people that is highly motivated to seek out content reviewing this kind of equipment. It is our sense that this kind of flat hook would only be effective if you have an already-motivated audience.
Your hook – like your video itself – could be very artistic and creative. The following video was created as a video abstract for a paper in cell (exceptionally long hook here, as a result of the technical nature of the video – 30 seconds).
We created a video for a paper that we co-wrote about science crowdfunding. The video was designed for scientists interested in running a crowdfunding campaign. We created our hook (7 seconds long) to use provocation to pull our audience in.
Here are a few more (audio) hooks courtesy of NPR. This NPR training guide focuses on how to avoid flatline stories. There are four parts to the guide, but only parts 1 and 2 are relevant for us. Under part two, you’ll see two (great) hooks for NPR stories.
Part 1d. The Audience First Story Arc
Last week, we focused on developing our story using the Audience First Worksheet. This week, we’ll be adapting our Worksheet to create the story arc for your video. The diagram below shows the Audience First Story Arc. Although it isn’t shown on the diagram, the x-axis is time and the y-axis is dramatic tension.
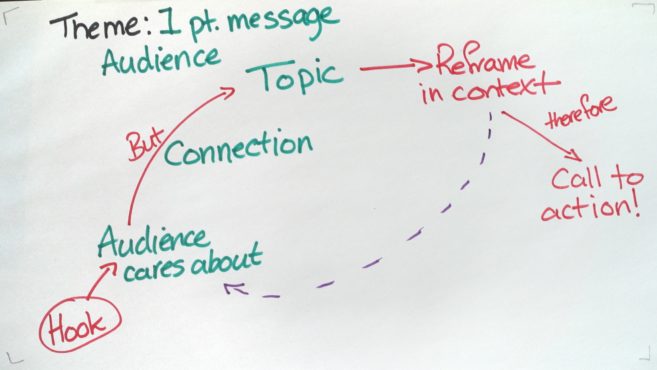
As you can see, creating this arc mostly involves rearranging the boxes from the worksheet. Just as a reminder, it is absolutely critical to have correctly defined your audience and that audience’s interests.
How do you transform your worksheet into a story arc? Follow the visual guide in the image above, starting in the lower left with your ‘Hook’ that ties into what your audience cares about, then work clockwise around the circle.
Here’s a video by our prior course collaborator Elliot Lowndes explaining this process a bit more:
As you create your story arc, remember that your primary purpose is almost certainly to get your audience to do something. As part of that, leaving dramatic tension unresolved at the end of your video can be very useful. What does this mean? A typical story you might read or see, goes something like this: hero has problem (dramatic tension increasing), hero solves problem (dramatic tension resolved). But what if you only partially resolve the tension at the end of your video? That can be a highly motivating way to get your audience to do something after your video is over.
How does this work in practice? Well, let’s take a look at the Breaking Bad video that was mentioned earlier in these instructions. It may not seem evident, but the video actually does have a call to action for the audience – namely, watch the next episode! The cliffhanger ending of this video explicitly ends the story halfway. It leaves the story with a great deal of dramatic tension remaining. All of this is done in hopes that the viewer will be motivated to do something to relieve the tension (in this case, watch the next episode).
Here’s another example, from a very popular YouTube science channel. The following science video answers the age-old question that you have all been wondering: could Godzilla exist? The video follows a classic format of asking a question, exploring the answer, and then definitively answering the question. Take a look:
However, imagine this video ending at the 1 minute, 10 second point. Up to this point, the problem has been raised and a potential answer is hinted at. Nonetheless, there is still tremendous dramatic tension remaining in the video, as nothing has actually been resolved yet. If the video had ended here, followed by a call to action (like: find the answer in my next video, or find the answer on my website, or follow me on Facebook to find out the answer to the story), many viewers might be highly motivated to act.
PART 2. THE SECRET TO GOOD VIDEO IS GOOD AUDIO
Before we get to your specific assignment for the week, let’s first talk about some of the elements of compelling video. The most compelling part of the video isn’t the visual stuff at all – it’s the audio. As we’ll be talking about at greater length further along in this course, your potential audience might well put up with poor quality visuals. They certainly won’t put up with badly recorded audio. But just how do you record good audio? There are three critical components: use a microphone, record in a quiet space, and read your script in an even tone. Please watch the following short video for a demonstration of these three points:
Another important factor in good audio is positioning your microphone correctly. Please watch the following short video for some tips in lavalier microphone placement (the kind of microphone being used in this class):
PART 3. ADDING TEXT TO YOUR VIDEO
In the Week One instructions, we suggested that you might add text to your video. Unfortunately, our how-to video describing how to do that was a little dated and no longer quite lined up with the current version of HitFilm Express. So, let's try this again! Below, please find a video describing how to add text to your video with the current version of HitFilm Express. In particular, the video describes how to create something called a "lower third", which means adding text to the lower third of the screen. It is an technique extremely commonly used in video. Here's an example:
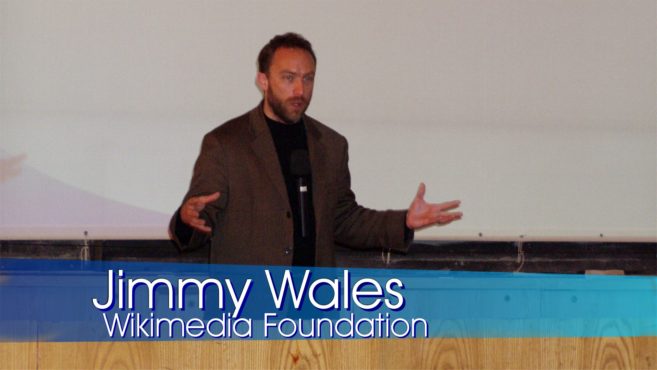
And here's the video describing how to create your very own lower third:
PART 4. CONSOLIDATED TO-DO LIST
Having any problems or concerns? Jai and Kristen (jai@scfund.org and weiss@nceas.ucsb.edu) want to hear from you!
- The first thing you should do is to sign up for a video session for this week. Remember, although it would be ideal if you have started work on this week’s assignment before your session, it is only really critical that you have read through the instructions ahead of time. In case you missed it, the Week One instructions go into how the video sessions work.
- Using your Audience First Worksheet from last week, devise your story arc. Additionally, think of a short hook (Around 5 seconds is best) for the beginning of your video that will immediately engage your audience.
- Create a video that contains your hook as well as describes your story arc. All of the audio for this video should be recorded with your lavalier microphone or other external microphone. You should record the audio using the best practices described in these instructions. Additionally, you can find out how to edit video in HitFilm Express in our Week Zero instructions.
- In the first part of the video, show your hook.
- If the visual for the hook is something you can record now, do so.
- If the visual is not currently accessible, create a temporary visual. This temporary visual should be a blank background with a few words indicating what the visual will eventually be (see example below). You can easily create this temporary visual as a slide in Powerpoint, Google Slides, or whatever your favorite presentation software happens to be (save the slide as an image, which you can think import into HitFilm Express). Alternatively, you can create this temporary visual directly in HitFilm Express, using our "Adding text to video" instructions in Part 3 above.
- With either visual, say the dialogue for the hook you would be using in your actual video to your target audience. If you are not planning to speak during the hook, provide whatever other audio cues you would be using instead.
- In the first part of the video, show your hook.
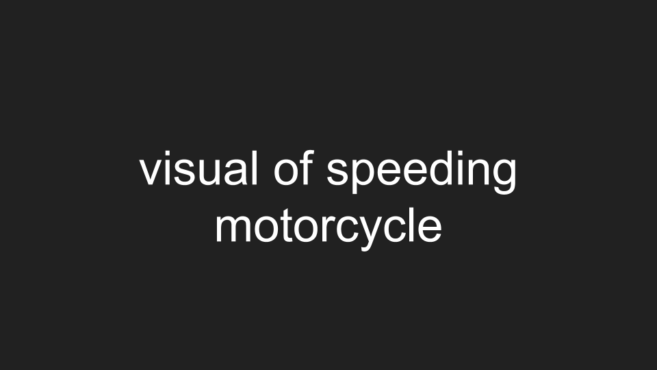
-
- In the second part of the video, show a still image of your story arc. With that image on screen, describe your story arc as you would explain it to someone in this class (that is – not to your target audience). Be sure to specify your target audience as well as your one-point message in your description. Please don’t spend time writing out a script for this second part – just talk into the microphone describing what you’ve got.
- Upload your video to Youtube then share a link with the class via a post in the Community Forum (on the Week Two sub-forum). Please give comments to at least three other videos. Here are some of the things to keep track of in your comments: Does the hook seem like it would grab the target audience? Is there any language in the hook that seems potentially off-putting to the target audience? Does every element of the story arc make sense, given the audience? Does the arc build dramatic tension?

