#SciFund Challenge Class
2019 Video Class: Week Four
Congrats, you’ve made it to Week Four of the SciFund Challenge 2019 video training class! This week, it’s all about editing. You will be using editing to combine your story arcs and footage that you listed in your scripts into actual videos that connect with your audience.
WHAT TO DO IF YOU’RE BEHIND
Before we get to all of that, let’s address a super important point. Many, probably most, folks in this class are now behind. Don’t worry though: Jai and Kristen have got your back. We realize that we are throwing a ton of material at you each week and that it can be hard to stay on top of things. So, if you’re behind, what do you do? First and foremost, don’t quit! We have a good strategy for you that can keep you on track.
Here’s the strategy if you’re behind: just focus on the beginning of your video. This week we are getting going with editing and it is really important for you to try your hand at it – after all, you can’t make a video without it! So, shoot the shots that you’ll need for the first few sections of the video so that you can get going with editing. How many sections? Whatever number you have time to nail down. Worst case scenario, you can just focus on the hook: there are only 5-10 seconds of video to worry about there (plus, it’s the most important part of your video anyway).
Secondly, no matter how behind you are, please do participate in a video discussion sections for the week. In fact, the further behind you are, the more these discussion sections can quickly help you to catch up. Here's the link to the Google Calendar (shown again in the to-do list at the end of these instructions).
But what happens at the end of the class if your video isn’t completed? And how do you get feedback on your second or third video that you’ll be working on in the future? We’ve got your back there too. The Community Forum for the class will stay open for you to get and give feedback. Jai and Kristen will also continue to make themselves available as needed if you continue to have questions as you wrap up your video. So, this class isn’t over at the end of our five week session.
WEEK FOUR INTRODUCTION
Okay, on with the show. For this week, you have several tasks lined up:
- Edit your video
- Build a rough assembly (outline in your editing software)
- Start a rough cut (rough draft)
- Understand how the addition of sound can drive the emotion conveyed by your video.
- Learn how to find audio and visual elements that you can legally use in your video
- Upload your draft, or section of your draft to the Community Forum
- Give feedback to the videos of at least two other participants
- Participate in a one-hour discussion about the week, via Google Meet.
Last week we talked about writing the scripts for your video, and then you built out those scripts to include what emotions/ reactions you wanted from your audience in each section. Next, you listed the content you wanted to shoot for each section of the script using a storyboard, and began thinking about shooting sections of your video.
Finally, we also talked about the right way to deliver or speak (not read!) your script to camera. This week, you will be using that recording of your script as the basis to build the rest of your video.
If you missed Week Zero and have never edited before, you will need to review the initial tutorial from that week for HitFilm Express to get the basic mechanics of using the software under your belt. The Week Four instructions have been written assuming you already know how to do certain things covered in that tutorial, like:
- Importing footage into the software
- Making changes to clip duration (making cuts)
- Unlinking audio tracks from the video clips
- Changing global audio levels of an audio track
- Keyframing audio levels
In fact, before we go any farther. let's show that intro to HitFilm Express video from Week Zero again:
MATERIAL FOR THE WEEK
Before we can get into editing for real, you need to first make a rough assembly of all the material you have shot which includes your A-roll (your recorded script), and as much B-roll as you have had time to shoot and gather together. Here are the steps to making your rough assembly.
PART 1. ROUGH ASSEMBLY
Here’s a video on how to set up your master project settings and begin your rough assembly in HitFilm Express. One very important note about this video is that it was created a few years back by Elliot Lowndes, an incredible wildlife cameraman who used to teach this course. This tutorial video was created in HitFilm Express 4 and the version of HitFilm Express that you are using (likely 13) has changed somewhat. Nonetheless, it is well worth watching the video, as Elliot is an incredibly talented film editor. Any discrepancies between your version of HitFilm Express and the version used by Elliot in the video below, can easily be addressed by taking a look at the Week Zero tutorial video (shown above in these instructions)
Here are the overall steps in text form:
- Create a new project in your editing software. It is really important to match the settings of your project with the quality and resolution of the video clips you create with your phone. For iPhones and most smartphones, this will be: 1920 x 1080 (Full HD 1080p) and 30fps, but you should check (e.g., by Googling) the video format for your specific make and model of smartphone. You can also check the properties of video files created with your phone using right click, get info (mac), or properties (windows) to at least find the dimensions of the video files (called frame width and height in Windows). In HitFilm, make sure the first thing you bring onto your new project timeline is a video clip that has the dimensions of 1920×1080. HitFilm Express also provides a way to check out the specs of your video clips, which we relate in the Consolidated To Do List at the end of these instructions.
- Import your narration/script recording. As part of the Week Three exercise, we asked you to record your script delivered to camera. If you have recorded this, bring it onto the timeline. We will use this as a base to build the rest of our video from. Don’t worry if you’re not happy with your script recording, it will be good to get started with a rough version and swap in the final recording later. If your video won’t feature yourself, then make an audio recording of your script and use that. If your video includes no talking at all, then you need to think about this a little differently. For videos with no talking, the music and other audio will actually drive the initial pacing of story. If this applies to you, go to the section about music choice below. Once you have chosen the music for your video, add it to your timeline in place of your script and then continue to Step 3. For videos with talking don’t worry: we will get onto music choice later.
- Add your B-roll and illustrative shots (what you have so far) onto the timeline roughly where they are mentioned in the script. Alter the length of the B-roll clips so they fit nicely over the relevant section. For sections where you have not managed to source the B-roll yet, add a card in there with some text as a reminder that it still needs to be recorded/found (if you’ve forgotten how to add text to your video here’s the video from week 2 explaining it).
- This is a good point to save your project (and save often). Through the editing process, the story may change, or you might want to try out different structures and versions. The rough assembly is a good point to start any later version from because you have already done a good deal of cutting and clip length alteration. Make a duplicate copy of the project at the rough assembly stage and save for later.
- It can be a little tricky to add images to your HitFilm Express project, particularly if the resolution of the images don't match the video resolution that you set for that project. If there is a resolution mismatch, then those images will likely not display to your liking in HitFilm Express. Fear not though, as this issue is easily corrected Here is a quick tutorial on adding images to HitFilm Express (with an emphasis on dealing with resolution mismatches). This video doesn't get into more advanced image effects, like panning or zooming in or zooming out (that's coming next week).
PART 2. EDITING
Rough Cut (rough draft in film speak)
Now that we have a rough assembly of our story on the timeline, we can begin to think about some basic editing principles to help tell our messages and perhaps even help elicit those potential emotions that we noted on our script worksheet.
The craft of editing is as much about how and when to make cuts in your footage as it is about learning to use the tools in the software.
Before we get started, let's paraphrase something from editor Walter Murch in this video. Editing is a lot like dancing. We can explain the rudiments of dance to you here, but to learn how to dance you really just have to dance. Editing takes practice, so don’t expect to be able to apply all these ideas in your first video. We’re making short science videos, so we can’t possibly fit all these ideas in one go either, but it is good to learn a little “visual literacy” so that you can try to apply an idea if you see an opportunity.
The process of editing a rough cut of your video is a lot like writing a paper. After laying down the overall story, several successive passes are made over it. Each time you fine tune and alter a different part. Here is a general summary of each pass in the order they should be done:
- Order – The order that you show things in your video. Linking all the video you have together on the timeline
- Timing, speed, & rhythm – The speed that those clips are shown in your video
- Add transitions, effects, and other material (photos, animations)
- Add music and sound effects
So let’s get started editing our videos…
Shot Order
Just placing one image after another implies a connection between the two things in those images. Sometimes you can use that knowledge to help increase dramatic tension. Watch this video from past course instructor Elliot Lowndes to see this point demonstrated:
Timing, Speed & Rhythm
- Timing involves showing relevant images that match the audio track (script or music). This step will have most likely been done during the rough assembly stage. Remember you can also cut up your script to make longer pauses if you need more room for your clips (as long as those pauses sound natural)
- Speed is how quickly shots are shown from one to the other in a sequence. When a video cuts from one image to another quickly it can feel more energetic, raising the dramatic tension. Leaving a shot on for longer can achieve the opposite effect. Here is an excellent description of that idea, using the scene in The Empire Strikes Back where Luke tries to use the force to raise his X-wing out of the swamp (the link will start the video at the relevant point. Watch to 5:20). The Delorean video also uses this trick. Shots of work on the car get shorter and shorter until the car is ready.
- Rhythm is specific to every shot and is dependent on the context and the content of the image. Every shot has a lifespan of its own. With experience, you can tell when a clip needs to be cut because it just feels right. Here is a great demonstration of that idea (watch to 7:43). Noticing when a clip plays for too long can be difficult, especially if you have been editing a project for a while, or you really like a particular shot. It’s best to get another person’s opinion on it (like in the comments on the Community Forum). Decisions on speed and rhythm are best made when a clip is in context of the other clips around it; play through a sequence several times, taking a look at what is working and what isn’t. Timing, speed and rhythm are three things you can think about when making a cut to help guide your audience through your story.
Cutting on the Action
As we saw in Week Zero, we can cut on the action to help an edit feel more natural. This is most easily done when we have the same action, shot from two angles. Watch this to see cutting on the action demonstrated (watch to 0:57).
Transitions
Transitions describe how a clip cuts from one to another in your video. Generally speaking, you can order types of transitions by how frequently you should use them in your videos, from most to least used:
- Straight cut – Take a look at any TV show or film and the majority of cuts in there will be straight cuts. The shot on screen just changes from one to another. How well a straight cut works and how natural it feels will depend on the timing, speed, and rhythm described above.
- L cuts & J cuts
- L cut– An audio based transition. Audio from the current clip carries forward into the next. Here’s how to apply an L-cut in HitFilm (the clip was made in HitFilm Express version 4, but is still be accurate).
- J cut – Another audio based transition. This is the reverse of the L cut. Audio from the next clip is introduced while we can still see the current clip. Here’s how to apply a J-cut in HitFilm.
- Fades – Fading to or from black or white draws direct attention to the cut and can be a good way to add impact to a shot. Here’s how to apply a fade in Hitfilm. Also, take a look back at the Delorean video and see how they use fades to and from black to add impact and mystery. Generally, fades can also help imply several ideas and feelings, depending on the content of the shots being faded:
- Time passing – nostalgia, looking back
- Things appearing – revelation, mystery, questions
- Things disappearing – hidden, mystery, running out of time
- Eyes opening/closing – new, start, end, finality, previously unseen, new perspective
- Jump cuts – This is a straight cut between two clips from the same shot size and angle (ie look extremely similar). They can be used for two purposes:
- For visual effect: This type of jump cut has a rich history in film. An ‘accidental jump cut’ due to a camera malfunction is often cited as the birthplace of editing as a concept. Watch this video to find out more: Jumpcuts in HitFilm.
- To remove information: These are used to cut out mistakes or irrelevant information; they are about efficiency in a way. Due to the proliferation of vlogging and youtube where jump cuts are common; norms are shifting and they have made their way into factual films and modern cinema. To see a masterful use of jump cuts in a factual film, watch this section of the “Fog of War” by Errol Morris. Notice how he doesn’t hide the cut behind B-roll, although he uses B-roll later. A decision has been made that prioritizes seeing McNamara’s face over cutting away to B-roll. The jump cuts feel intentional and add impact to what he is saying. But if a jump cut doesn’t feel intentional or like a stylistic choice when watched, they can look amateurish.
- Cross dissolves – These also draw direct attention to the cut itself by mixing the current and next images together for a brief amount of time. This type of transition should be used sparingly. It is good for emphasizing a direct connection between the two images being mixed together or implying a passage of time like the training montage in Rocky. People often use cross dissolves if they aren’t comfortable with a straight cut, however it is often better to review the timing of the cuts and/or trying J/L cuts before resorting to a cross dissolve. Here’s how to apply a cross dissolve in HitFilm.
- Wipes – These come in different styles stars, shapes etc; the most basic is the straight wipe from one image to another. Here are some examples of wipes in practice. They can appear dated or over stylize your video so most of the time they should be reserved for Star Wars movies and home videos only. But if you think the style of your video makes wipes to be a good fit, then here is how to create a really simple wipe in HitFilm.
Useful Documents
Extensive manuals are available online for Hitfilm. Don’t let the mechanics of using the software get in the way of your creative goals. The manuals won’t give you any guidance on the craft of editing, but if you have an idea for something that you don’t know how to pull off in the software, reading these may help.
Review
Nothing else tells you what is working in your video, and what isn’t, like sitting down with someone and watching your rough cut. When you have to play the video for someone else, you will be able to see where you need to make adjustments to the edit and change things around if you need to. The other person watching can also give you valuable feedback on what makes sense and what doesn’t.
PART 3. USING SOUND TO HELP CONVEY THE EMOTIONS LISTED IN YOUR SCRIPT
Do you know the kind of emotions that your want your video to convey to your audience? If the answer is yes, you are well on your way to having a successful video. But how do you convey that emotion? The proper choice of sound is a key consideration.
You essentially have three choices with sound throughout your video:
- No added sound (other than your voice speaking the script).
- Added sound designed to directly place the viewer in the location of the scene in the video (for example: sounds of the ocean if you are talking about something beach-related).
- Added sound that does not directly relate to the setting of the scene, but is instead a more metaphorical choice purely designed to convey an emotional feel.
Above all else, remember this rule: any sound in your video should be a deliberate choice by you that furthers the goals of the video. The number one goal? Keep your audience watching.
Here’s an illustration of your overall sound choices:
All too often, science videos use non deliberate sound – specifically a backing track of non-deliberate pleasant music that serves no purpose other than to be, well pleasant. For some reason, the most popular of this kind of background music in science videos is soothing solo guitar or banjo. This kind of non-deliberate sound is distracting and actually detracts from your video.
You are much better off with no sound than non-deliberate background sound. Here is an example, using a section from our Snowy Plover video. In this first video, you’ll hear Jai speaking with no added sound:
The following video is a repeat of the first, except that a banjo background track has been added. You can hear that the second version is actually much worse than the first version.
Here’s a third version of that video, this time with the sound of waves in the background. How does this influence how the video feels
Finally, here’s a fourth version with a driving music track in the background. Notice how it adds momentum to what Jai is saying. This kind of track would be very annoying if it ran all the way through the entire video, but it can add urgency if used sparingly.
Of the four choices given above, the only one that is clearly wrong is the banjo version. Any of the other choices could well be the correct one for this video, depending on how the video as a whole is structured.
If your video has no talking in it, then the music plays an even more important role in your video. Choose a music track that not only suits the subject matter well, but also conveys the types of emotions that you want your audience to be feeling when they watch the cool images that you will be showing over the top. In these circumstances, use the tempo of the song to guide how you cut the clips in your video. Here is a video made with music only. Cuts are either timed to the music, or movements of the butterflies were matched to the music to give the video a sense of pacing.
PART 4. USING OTHER PEOPLE’S STUFF IN YOUR VIDEO
Almost certainly, you’ll want to use other people’s materials in your video (stuff like images, audio, music, or video clips). The trouble is that every video, image, and audio clip was created by somebody and that somebody most likely retains copyright control. How can we use other people’s stuff legally and for free? There are three basic ways. Please note that we base this section on copyright law in the United States – your mileage may vary if you are elsewhere.
- Ask. You will be surprised at how often people say yes and sometimes, they will even recommend you use something better. You can always reach out to the content creator of the thing you want to use and ask for permission to use it in your video. This method works surprisingly effectively, especially for non-famous content creators. The less well known and the smaller the entity you are contacting, the more likely it is that they will say yes.
- Fair use. United States law allows for certain uses of other people’s content for free, without needing permission from the content creator – this is called “fair use”. Unfortunately, fair use doctrine is incredibly complicated and difficult to understand. Unless you have an intellectual property attorney advising you, this method is definitely not recommended.
- US Government material. Generally speaking, material produced by the US federal government is in the public domain, free for use as you wish. Here are just four to get you thinking:
- NASA
- National Oceanic and Atmospheric Administration
- US Fish and Wildlife Service
- US military. There are a surprising range of multimedia elements available from military sources. For example, there are roughly one hundred military bands, which have recorded a voluminous amount of music (and it isn’t all just marches and the Star Spangled Banner). Here’s the material available from just one of those bands, the United States Marine Band.
- Creative Commons (the way you probably want to go). Due to the incredible complexity of standard copyrights, a relatively new kind of copyright license has been developed – called Creative Commons – which encourages reuse and remixing of content.
![]()
Types of Creative Commons Licenses
There are several kinds of Creative Commons licenses, but the majority of them allow others to reuse content for free, so long as credit is given to the content creator. Some Creative Commons licenses only allow use if the resulting work is itself Creative Commons licensed, so keep an eye out for each license’s requirements. Here is a list of the different types of Creative Commons licenses available, sorted by best options at the top, and the types of licenses you should avoid at the bottom.
BEST OPTIONS
Attribution – CC BY – This license lets you distribute, remix, tweak, and build upon the work (like putting it in a video), even commercially, as long as you credit the author for the original creation. This is the most accommodating of CC licenses offered. Recommended for maximum dissemination and use of licensed materials. You can do whatever you want with your video as long as you credit the author of the CC material.
Attribution-NonCommercial – CC BY-NC – This license lets you remix, tweak, and build upon the work (like putting it in a video) non-commercially, and although your video must also acknowledge the author and be non-commercial, you don’t have to license your video as creative commons.
2ND BEST – USE WITH CARE
You could potentially use material with these licenses below, but using that material comes with the condition that your video is also shared under the same creative commons license once it’s online, even if you just use one photo with the SA (Share Alike) suffix in your video. You should avoid material with these licenses if:
- You don’t want your video, or parts of your video, to be used in other creations that you have no control over
- People/ Institutions that fund your research, or your employers object to information, video, other things being in the creative commons
Attribution-ShareAlike – CC BY-SA – This license lets you remix, tweak, and build upon the work (like putting it in a video) even for commercial purposes, as long as you credit you and license your video under the identical terms. This license is often compared to “copyleft” free and open source software licenses. All new works based on this will carry the same license, so any derivatives will also allow commercial use. This is the license used by Wikipedia, and is recommended for materials that would benefit from incorporating content from Wikipedia and similarly licensed projects.
Attribution-NonCommercial-ShareAlike – CC BY-NC-SA – This license lets you remix, tweak, and build upon the work non-commercially (like putting it in a video), as long as you credit the author and license your video under the identical terms. Please note that if your video is being used for a directly commercial purpose – like for example, as part of a crowdfunding campaign – this category won’t work for you.
AVOID
Using any material with either of these licenses below, in your video, could get you into trouble.
Attribution-No Derivatives – CC BY ND – This license allows for redistribution, commercial and noncommercial, as long as it is passed along unchanged and in whole, with credit to the author, which means you can’t use it in a video.
Attribution-NonCommercial-No Derivatives – CC BY-NC-ND – This license is the most restrictive of the six main licenses, only allowing you to download the work and share them with others as long as you credit the author, but you can’t change them in any way (like putting it in a video) or use them commercially.
THE BEST PART
The best part? There is a whole universe of Creative Commons material out there – just waiting to be used in your video. Just pay attention to the specific Creative Commons license of the thing you want to use (the license type will always be prominently posted).
Finding Creative Commons Images
- One great repository of Creative Commons images is Wikimedia Commons. Wikimedia Commons also contains audio, and video, but the strength here is definitely images. A lot of the licenses for these images come under the suffix of Sharealike (SA), so watch out for those, unless you expressly want to license your video under creative commons too.
- You can search for Creative Commons images with Google, in Advanced Image Search. At the bottom of that Google Search page, you’ll see a “usage rights” box, where you’ll want to select “free to use share or modify”. Always do a bit of digging when you use Google image search though, sometimes copies of images have been incorrectly designated creative commons, while the originals aren’t. Make sure the source of the image is reliable.
- Two sites that offer a wide variety of professional stock images for free are Pexels (also has a bit of video) and Unsplash.
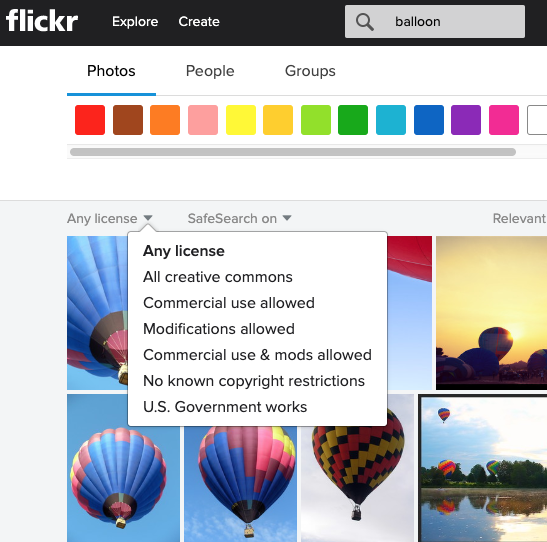
- Another super resource for Creative Commons images is flickr. Once you have searched for something on flickr, you can restrict your search to Creative Commons stuff (be sure to select “Modifications allowed”). See the image below, for an illustration.
Finding Creative Commons Audio
The problem with finding good audio for your videos, and especially after spending time flicking through videos and photos, is that you can’t speed listen to audio. Which means that finding the right music is time intensive, you just have to listen to it. The difference that good music can make on your video means that it is worth it though, so keep listening!
- Music: Five fantastic places to find creative commons music are:
- ccMixter (use Tag Search, which is at the top of the screen)
- Youtube free music library - browse by genre, instrument type, emotion, and more; some songs require attribution, others require no credit for use.
- Free Music Archive
- SoundCloud: Here is a screencast guide to searching for CC material in Soundcloud. Here are some users who upload CC material to soundcloud to get you started: Tom Chapman, Nicolai Heidlas, Steven O’Brien. The download link to the track may be hidden in the track description. Always check the license, which should also be listed in the description, before downloading. If there is no download link, contact the composer through SoundCloud.
- Incompetech: A huge compilation of music composed and compiled by the one man band, Kevin Macleod. If you’re having trouble finding what you need among his hundreds of songs, get in touch with him on Twitter (@kmacleod). Give him general moods and feelings to help him find a match.
- Sound effects: If you are looking for sound effects (sounds of the rain forest, a truck backing up, a rocket lifting off, etc.), Freesound is the way to go. A free registration at the site is required to download from Freesound. Another site with a less extensive but in some ways different collection of sound effects is Free SFX. There are also channels on places like youtube and soundcloud that do CC sound effects too. Here’s OrangeFreeSounds from Soundcloud.
Finding Creative Commons Video
- One place to find a vast selection of Creative Commons video is at the Internet Archive.
- Another source is Vimeo. In Vimeo, once you have searched for something, click on “Advanced Filters”. In the resulting box, under License, try all of the licenses except the “No Derivs” licenses (the latter meaning “no derivative works”, meaning “don’t mess with my stuff”). Though a few videos are directly downloadable from Vimeo, most aren’t. You will likely need to use a third party website for the download. There are many such sites, but we recommend Clip Converters (which should work as follows):
- Paste the URL of the video you want to download
- Select MOV
- Press continue
- Select the highest resolution available
- Press start
- Press download
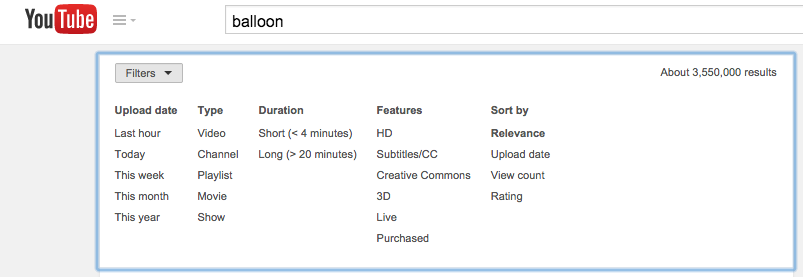
- A last source for video is YouTube. Once you have searched for something, you can filter your search for Creative Commons licensed material (using the Filter link in the upper left of the YouTube screen - see image below for illustration). As with Vimeo, you will need to use a third party site to download the video.
PART 5. ASSIGNMENTS FOR THE WEEK
Your assignment for the week is to complete a rough draft of your video (known as a rough cut, in film-speak). Please fill out your video timeline with all of the audio and video that you have been able to shoot and gather together so far. The key thing to remember is: don’t panic! This draft is just that – a draft. It shouldn’t be perfect, so don’t feel the need to spend endless hours on this week’s video. The real purpose of this draft is to get feedback from your classmates. In order to do that, please upload your video to the class Community Forum Week 4.
For your second assignment, please give feedback to the videos of at least two other classmates. And lastly, please sign up for and participate in an hour-long discussion section, via Google Meet.
Remember! If you feel far behind, just focus on getting the first few sections of your video edited together – perhaps just the hook, if that’s all you have time for.
CONSOLIDATED TO-DO LIST
- Right away, please sign up for a group Google Meet session for the week .
- Following the instructions above, build a rough assembly of your video in your editing software.
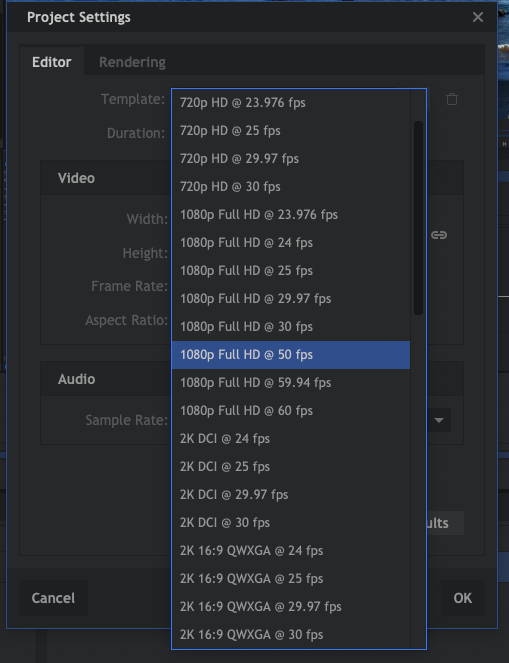
- Create a master project with the dimensions of 1920×1080 in your project settings. You can set those project settings in HitFilm Express by going to the following menu option File > Project Settings. In the window that opens, under Template, select one of the "1080 Full HD options" (see image below). Select the option that matches the frames per second (fps) of your video clips. Then hit the OK button.
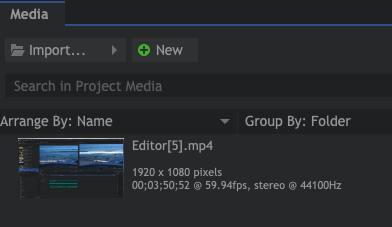
What if you can't guess the frames per second of your video clips? Don't worry, HitFilm Express will tell you. Once you have imported the clips into HitFilm Express, you can check the specs out in the Media Panel and then change your Project Settings to match. In the example below of a video clip in the Media Panel, you can see the following specs given:
- Resolution - 1920x1080 pixels
- Length - 3 minutes and 50 seconds
- Frames per second: 59.94
- Audio: stereo recording that was recorded at 44,100 Hz
-
-
- Import your recorded script as a base to build on. If you have not recorded your script yet, then record a rough version, just to have a base to start building your video on. If you’re unsure on how to record your script, then head to the Week 3 instructions to refresh your memory.
- Lay down a rough assembly of your visual story, using all the visual elements you have managed to record and find so far. Place your visual elements onto the timeline, above the recording of your script and place each visual element at the relevant section.
-
3. Start putting together the rough draft of your video (rough cut) while thinking about the following things to amplify dramatic tension in your video:
- Shot-order to tell the right visual story.
- Timing, speed and rhythm of your edits for building tension.
- Using transitions to add visual effect and impact.
- Use resources like creative commons to find video and images that you can’t make yourself. Add any you find to the rough cut.
- Decide what kind of music would best help drive the mood of your video. Any audio that you add or keep in your video should intentionally add to the emotional response of your audience, in line with the potential emotions noted in your script from Week 3.
- Use Creative Commons to find music tracks for your video. Add music to your rough cut if you find some.
4. Upload a rough draft of one section of your video (or as much as you have managed to do) to the Week 4 Community Forum.
5. Give feedback to at least two other people’s videos.
6. Let’s talk about how the week is going through an hour discussion, via a Google Meet session with Kristen or Jai.