#SciFund Challenge Class
2019 Video Class: Week Three
Welcome to Week Three of the SciFund Challenge 2019 video training class!
Last week, we looked at planning our videos and adapting our science to the visual medium of video, using story arcs and dramatic tension. This week, we’ll be translating our story arc into a script, and using storyboarding to help you plan your video sequence. We’ll also be shooting the scenes that will be combined later on in the class into our actual video. To do all of this, we’ll be thinking about the principles of script writing and cinematography that can be used to make videos more professional.
This week you’ll be doing the following:
- Writing and recording the script for your video.
- Running your script past a class partner to get feedback.
- Deciding on the shots that you want to use to illustrate your science message and how you’re going to shoot it.
- Shooting your shots.
- Taking part in a one hour group discussion, via Google Meet.
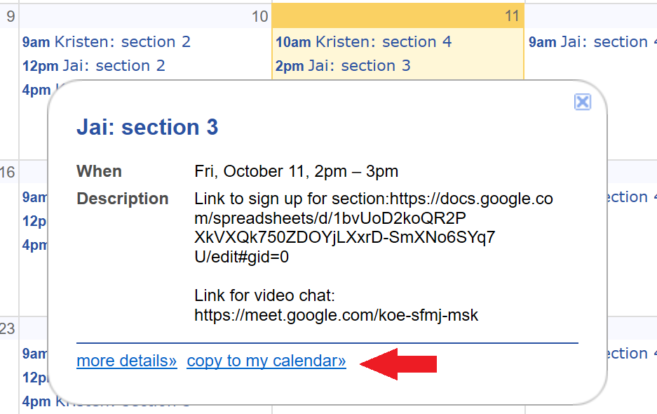
First things first. Before you do anything else, please sign up for a group video session for the week. Just in case it slipped your mind, you can find the instructions on how this group video thing works in Week One. Additionally, some participants in the class have noted that they have been a little uncertain about the timing of the video sessions. There are two ways to be in sync with the session times. First, the Google spreadsheet where you sign up for a particular section now includes the time of each section (using US Pacific Time). Second, the sign up for a group video session (here's the link again) takes you to a Google Calendar. By clicking on a a desired video session in that calendar and then hitting "copy to my calendar" in the bottom of the box (see red arrow in the image below), the video session time will be incorporated into your very own calendar.
As another top priority, find a class partner with whom to practice your script (the details of the exercise are in the consolidated to-do list at the bottom of these instructions). Here is the Google spreadsheet for partnering up.
PART ONE: THE SCRIPT
You hear differently than you read
You may find it surprising, but the audio in your video is more important than the actual video itself. And the key part of that audio is almost certainly the voice or voices that you hear speaking through your video. Most likely, the person speaking through your video will be you, the scientist.
Here’s why the person speaking is so critical. We all have had the horrible experience of sitting through a talk where the speaker read directly from prepared remarks. Those talks are almost always very difficult to follow, very boring, and generally excruciating. To make matters worse, most of these talks have been ones where we were trapped in the room, with no opportunity to immediately flee. The audience for your video has a huge advantage over an audience that is stuck in a room, suffering in silence. If your video audience finds your script difficult to follow or boring, they will immediately run away – far, far away.
Creating a story arc with dramatic tension for your video will go a long way to holding your audience’s attention. But crafting the right kind of script is an essential part of the equation as well.
Why is hearing a written speech generally so terrible? It’s because written language is very different than spoken language. With spoken language, the vocabulary is much simpler as is sentence structure. Very frequently, people don’t even speak in complete sentences. Because you are writing your script for the ear, and not the eye, you want to emulate how people speak. Simple, simple language! Note though, you can still tell a complex, rich story with simple language. We all do it everyday when we talk to each other.
Here’s an exercise that you can do in your head wherever people are having a conversation. As people speak, diagram their words in your head. You will find that people generally speak in a way that would look ridiculous if written down. Again, it’s not that the ideas are ridiculous, just the sentence structure and kinds of words that are used.
Here is a good example from a science story on NPR. We wrote a transcript of the audio which we overlaid on top of the audio:
Notice in this NPR example how simple the language is, particularly when people are speaking in interviews. Notice also how people use fantastic imagery and analogies in their descriptions to explain very complicated concepts.
Avoid jargon
In your script, you 100% want to avoid the use of jargon. After all, you undoubtedly are already aware that speaking in jargon gets in the way of communicating with people outside of your field. Even still, it is very difficult to avoid using it. Here’s a short reading that can help you: a fast-reading article from Physics Today: Communicating the science of climate change. Focus on the section “Better communication”.
Why is it so hard to stay away from jargon? Here’s the number one reason: it is very difficult to unlearn what you have already learned. Anyone who has taught an introductory level course knows that it is very tough to get into the heads of those who have no prior knowledge of the subject. On the flip side, we all have had the experience of floundering through classes where the instructor completely overestimated the knowledge level of the students.
There is another tricky issue: what is jargon to one audience is a perfectly understandable term or idea to another audience. It can be really hard to know ahead of time which is which for your audience.
There is a final trap: double-meaning words. At least with unknown terms, your audience knows that they don’t know what is going on. A more insidious problem is language that has one meaning for your audience and a completely different one for you. With double-meaning language, your audience could easily misinterpret your remarks. For example, for evolutionary biologists, “fitness” refers to reproductive success; in the wider world, that’s not the first thing that would come to mind. And there are plenty more terms to trip over: aerosol, radical, organic – the list goes on and on. The Physics Today article suggested earlier delves into this topic at length. And inspired by that article, the fantastic science communicators at the blog Southern Fried Science organized a crowd-sourced list of even more double-meaning words, which you can find here.
So, in the end how do you solve the jargon problem? The most effective way is to get feedback from someone else, preferably someone who is not in your field. You get bonus points if you can find a member of your target audience on whom to test your script. On account of all of this, one of the things to do for the week is to practice saying your script with another member of the class (details further down).
You don’t have to say everything
Remember, you aren’t putting together a radio show. You have a whole visual channel to help convey your story. An image or video clip can often deliver parts of your story more efficiently and effectively than you can say those parts. As you are planning your script, try to think imaginatively how you might use images and video for visual storytelling. At this stage, don’t worry about the possibility that you don’t have (and can’t create) the visuals that you want. Next week, we’ll be talking about how to legally obtain more images, video clips, and sound effects than you could ever potentially use.
Your script needs to be short
How many words should you be aiming for in your script? A lot less than you might think. Next time you listen to or watch a news broadcast on the radio or television, pay attention to just how slow the newscasters are actually speaking – it is actually much slower than normal human speech. They speak slower for a reason: it makes their arguments easier to follow.
So what does this mean for you? Last night, Jai put on his best radio voice and we counted about 150 words per minute (not very much). This means you really need to cut a lot of non- essential stuff out of your script. Paring down like this will also help clarify your message and make it more engaging.
Okay, you now understand the pitfalls to avoid with script-writing. You have put together a great script that captures your story arc and is written in a conversational tone. Mission accomplished, right? Not quite.
Delivering your script the right way
It isn’t enough to have a great script – the words also have to be spoken in an engaging way. How do you this? Really all you are aiming for is to speak in a natural and conversational way. Sounds easy, right? Well, not quite. There is a huge disadvantage that you have when recording your message, either to camera or just with a microphone: it is a profoundly strange act to speak to an inanimate object. After all, talking to objects is usually not a sign of positive mental health.
Since your brain finds it so weird to talk to an object rather than another human being, your words are likely to come out all weird as well in a recording. Thankfully, there are lot of ways to combat this tendency – you are capable of talking like a regular human being on camera!
Suggestion one: don’t memorize
Don’t memorize your script or directly read your script when recording. You want to speak in a conversational way, which is very difficult to do if you are directly reading off a script (there’s a reason why being a good actor takes a lot of training). If you are reciting memorized lines, the effect will likely be much the same as reading off a piece of paper. Remember how someone directly reading prepared remarks during a talk is so terrible? Don’t be that person!
So, what are you supposed to do? Instead, just talk without prepared notes. By virtue of having written the script, it will be more or less in your head, even without memorization. Sure, what you say won’t exactly match your script, but who cares? So long as your key points are in there, you are good. To make things easier on yourself, you can record yourself speaking a section of the video at a time (more on this later).
Suggestion two: talk through the camera, not to the camera
Talking to an object is an odd thing to do – so don’t do it. Think of it this way: when you are talking to someone on the phone, you aren’t talking to the phone. You’re talking through the phone to a real live human. Using that idea, when recording yourself, imagine that there is a person right behind the camera. You are having a conversation with that person. If you can visualize that person as a member of your target audience, so much the better.
Suggestion three: talk at a reasonable pace
As suggested above, you should aim for roughly 150 words a minute, which is likely somewhat slower than you normally speak.
Suggestion four: keep your voice level
When having a conversation, people speak English generally in an even and level tone. When speaking to a camera though, it is very easy to speak in a sing-song or with an uneven tone. Because this is not how people generally speak, it can be very difficult to listen to. So, when saying your script, focus on keeping your voice relatively level. That doesn’t mean you should speak in a monotone! You are just having a conversation. If there is a particular point you want to nail, you can do so with an emphasis on those words that doesn’t involve a change in pitch or volume (see second video below for details).
Suggestion five: record in a quiet place
Your brain is incredibly good at filtering out background sound. That’s why you can have a conversation with someone at a noisy party. Microphones though don’t have this ability to filter things out. Any sounds near the recording will be picked up. Sometimes this is a good thing. If you want to demonstrate something in your video, recording the sounds caused by the demonstration can be very engaging. If you are recording in an outdoor space, you may well want some of the sounds of the outdoors in your video. However, background sound can also easily make your audio too painful to listen to. Many noises can hugely detract from your audio: ventilation systems, air conditioning units, refrigerators, running lab equipment, etc. The list of horrible noises is almost endless. Here’s the bottom line: record in a quiet space unless you make an intentional decision to do otherwise.
Suggestion six: do several takes of your recording
It is Murphy’s Law: the second you start recording is the second you will want to start coughing or sneezing. Consequently, it is going to be pretty rare that you are going to get it right the first time. Secondly, with several takes, you have more choices during the editing process. You may find that you prefer how you said a particular thing in one take versus another particular thing that is better in a different take. To make it easier on yourself, don’t run through the script of the entire video in a single go. Instead, record several takes, a section at a time (the hook, the call to action, etc.).
Just to remind you about how to position your microphone, here is a tutorial on lavalier microphone placement that we featured in a previous week of the class:
And here is an illustration of some of the recording tips given in this section (also provided earlier in this class):
PART TWO: DEVELOPING YOUR SCRIPT
In this section, we’ll be talking about how you can translate the principles of script writing given above to your video. Before we get there though, let’s give some examples. Last week, we showed a (bad) story-less video about the snowy plover that we created. Let’s see if we can do better.
Not Better
For purposes of comparison, let’s start by doing everything wrong. In the clip below, we show the “Topic” section of our story arc. Already in the story arc, we have grabbed our audience of dog walkers in Santa Barbara and established a common ground that walking your dog on the beach is awesome. The script here is for the topic section of the video: beach dog-walking is wreaking havoc on the snowy plover.
This first version of the script is one written for the eye, not the ear. I also added a lot of jargon and wrote it in the dense style of academic papers. To add insult to injury, I also read the script badly – I am actively reading my text as I speak. In the video below, you can hear my reading of the script, with a transcript of the words displayed. Notice that, though not written particularly well, the text makes much more sense when read than when written. Take a look:
Better
Okay, that was painful. Let’s try again for the script for the topic section of the video. The story arc that has already been covered in this version of the video is more or less the same, except that we have introduced the fact that this bird has ninja skills in catching insects. This time around, I’m speaking in a much more conversational way and the words I am speaking are simpler as well. Note that this version is much shorter than the last one. Despite that, with the use of the visual channel, we can convey just as much detail here as before. Take a look:
Converting the Story Arc Into Your Script
Last week, you completed your story arc. In the following Google doc, you see our version of the (good) story arc for the snowy plover video. Here we are just writing down the topline bullet point for each section.
Next, let’s write the script for each section, which you can see in the Google doc below. Remember to use the guidelines given above! Below, you can see our fleshing out of the video plan to include our script for each section. Note, below each script section, we also include the potential emotions that we would hope to evoke in our audience. It is really important to do this, for multiple reasons.
First, video is a medium that excels at conveying emotion. The purpose of these videos for most of you is to change the behavior in some small way of the viewing audience. Why do most people change behavior? A change in knowledge is part of the answer, but a bigger part is a change in emotional state. Consequently, keeping track of the specific emotions you hope to convey through your video is a key part of creating video that succeeds.
Second, by being aware of the emotions associated with each section, it will help you to select the right video clips, audio cues, and ambient sound to use. As mentioned earlier, don’t worry if you don’t have everything in hand right now. Next week, we’ll be discussing how you can find a giant range of audio, images, and video clips that you are legally allowed to use
PART THREE: THE LANGUAGE OF FILM
A tool we can use to describe the shots we want to use in our videos is with a system called A/B editing. A/B editing is a method of switching between multiple visual elements, in service of the story. We can consider the “A” to be the dominant video shot driving a particular section of your story. In the case of our videos, the “A” could be a video shot of someone (probably you, the scientist) talking to the camera.
The concept of A/B editing best applies to videos that have a dominant shot in each section. It could be someone talking, it could also be a location, or it could be a central visual motif that the story returns to every so often.
“B” are all of the other visual elements (photographs, video, figures, animations, etc.) that are also part of your video. “B” shots serve multiple purposes:
- To illustrate points that are being made in the “A” roll.
- To transition between points of the “A” roll.
- To cover editing cuts made in the “A” roll.
The “A” roll is driving your story. Even when we cut away from the “A” to show “B” visual elements, the voice we hear will still be the person talking from the “A” shot. This is a great video that explains why and how to shoot good B-roll.
Wait what happens when you have no script? How can there be an “A-roll” then? The principle of A/B editing only really applies to certain types of videos described above. For others, the concept begins to break down. For example, in the DeLorean Video, there is no dominant shot that we return to, there isn’t even any narration.
If you’re video doesn’t fit the A-roll B-roll model, that’s fine. It’s just one way to describe the visual elements in your video.
PART FOUR: PLANNING YOUR SHOOT BY STORYBOARDING
With the script for your video in hand, you can more easily make decisions on what images (video or still photographs) you want to illustrate that message. Afterall, a great script with no engaging visuals by itself belongs on the radio or a podcast. What your audience sees in your video can say as much about your message as what they hear. Making sure the content of your visuals tells the right story is the essence of shooting good video.
It’s useful to make a checklist of all the visuals you would ideally like in your video so you can check them off as you get them. A great way to organize your script and potential videos all in one place is by using a Storyboard.
What is a Storyboard?
A storyboard visually tells the story of an animation panel by panel, kind of like a comic book. It sketches out how a video sequence will unfold. A storyboard is similar to a trial-run for your finished film, video, or commercial, often laid out in a comic book-like form. Your storyboard should convey some of the following information:
- What characters or objects are in the frame, and where are they located?
- What are the characters saying to each other or to the camera, if anything?
- How long is each shot?
- Where is the "camera" in the scene? Close or far away? Is the camera moving?
Why make a storyboard?
Creating a storyboard will help you plan your video out shot by shot. You can make changes to your storyboard before you start filming, instead of changing your mind later. You will also be able to talk about your video and show your storyboard to other people to get feedback on your ideas. A lot of storyboards include sketches of each shot to help visualize the scenes in your video, but if you aren’t a great artist, you can just as easily write out what visuals will be in a scene.
To show what that looks like, we’ve created a sample storyboard for the Snowy Plover video.
When drafting your storyboard, here are some things to think about:
- Get creative about how to visualize ideas in your story arc – not everything can be captured on video. Consider photographs, screencasts, drawings, animation, props, and analogies.
- Think about if you’re going to include yourself in your video, or just your voice, or not at all.
- Think about cutaways and b-roll that we talked about in week zero, to visually illustrate key points or ideas.
Now is the time to dream big in terms of visuals. Think of the best thing that could visualize what you are saying in your script at that point and write it down. Let limitations like time, money, resources and geographical location reign you in later. If you put your dreams to paper now, you are more likely to find creative solutions to those limitations later. For each section, list more shots than you might need. When we get to editing, things come up that you haven’t foreseen and having some extra footage in your back pocket can be really handy. For this class, we encourage you to keep your storyboard fairly simple, whether you decide to make it more visual or text-based. But, for more info than you probably ever wanted to know about storyboarding, feel free to check out this link as a starting point if you’re interested in learning more about the process.
Coming up with the script for the snowy plover video reminded us of one really important thing about video: Not everything has to be said, especially if your images and other audio cues are already saying it for you. In the part of the script where Jai says “they really mess with the birds” we can add shots that illustrate the impacts that un-leashed dogs have without having to spend the time saying “dogs can disturb birds from the nests and make them take flight” . We have footage of the birds taking flight and being disturbed off the nest so we can let the images do the talking.
This is the Topic section of our video, using the same script as we showed earlier in these instructions. Take a look at the rough cut of that section:
And remember, you don’t have to shoot everything yourself. There may well be classmates who can help you out with material and ideas for your video. Head over to the week 1 discussion page on the Community Forum and check out people’s Audience First worksheets to see if anyone’s topic or geographic location overlaps with your topic.
PART FIVE: LIGHTING, COMPOSITION, AND FRAMING
Now you have a list of what you want in your video, it’s time to decide how you’re going to shoot it. Here are 4 principles in cinematography that will help you produce engaging, and more professional looking content.
1.Lighting
Taking the time to think about lighting your images (moving or still) will make a big difference to their quality. As the saying goes: beginners worry about equipment and professionals worry about lighting. Before we get into how you can best use available light (we’re assuming you don’t have a 3-point lighting kit), we should first understand the different types and qualities of light sources:
- Direct light: When lighting a scene for a photo or video, light can be categorized into two main types; direct and indirect. Direct light lands on your subject from mostly one direction and source. Some examples of direct light sources are a bare light bulb, an open flame, and the sun. Generally, a direct light source is small (physically, or because it is far away, like the sun). Direct light makes hard shadows (defined edge, and dark), and increases contrast. High contrast lighting is fine for many things, but can make unflattering shadows on faces.
- Soft light: Soft light is scattered and diffused. The light is landing on the subject from many different directions and has a tendency to fill shadows with a little light, making for softer shadows with less defined edges. A filmmaker can modify a direct light source into a softer, less contrasty one by increasing the surface area of the source. This can be done by bouncing a light off a white wall or ceiling, or by placing a diffusing material in front of the light (without creating a fire hazard). The larger the increase in surface area, the softer the light becomes. When clouds cover the sun, the cloud effectively becomes a new indirect light source, diffusing the sun’s powerful direct rays. Notice on a cloudy day, how there is generally less contrast, and that everything seems more evenly lit.
What does this mean for you? For taking video (or photos) of people, soft, large light sources are generally more flattering than direct light. If you need softer light on your subject, think of ways to increase the size of your light source, relative to your subject. You can bounce a lamp off the wall, or white poster-board. If you need to take any shots outside, these considerations will help you decide what weather might be best to shoot in. We can’t all wait around for the right weather conditions like Ansel Adams, but we can choose to shoot in open shade when we are forced to shoot on clear, sunny days. Also take the time of day into account. Early morning light, especially during winter months, is extremely flattering and soft, due to the angle of the sun in the sky and diffusing effects of the atmosphere. Notice that sunlight around 12-3pm on a clear day is not only uncomfortable to work in, but creates some unflattering, downward pointing shadows on people’s faces. Ultimately, we’re making non-fiction videos and a lot of interesting things happen in life with no thought to how good the lighting is. As always, content will trump technical quality every time, but if you have these ideas in mind you can plan to shoot with the best light available to you.
Here is a video our colleague Elliot made demonstrating the principles explained above:
2. Composition – The rule of thirds
Like most things in life, composition can’t be boiled down into one “rule” that fixes everything, but used in the right circumstances, “the rule of thirds” can sometimes bring some order to a cluttered shot, but it shouldn’t be slavishly adhered to. It’s also the one principle from composition that we have the time to apply as we record real things and real people.
The rule of thirds states that if you split your image into thirds horizontally and vertically (making 9 sections), and place your subject at the intersection of two of these lines, the composition will feel more intentional and perhaps be more aesthetically pleasing.
There is more to framing and composition than the rule of thirds, but as non- fiction video makers, we don’t always have the luxury of meticulously planning out our shots to the extent that Leonardo da Vinci did when planning his paintings, using arabesque curves and dynamic symmetry. Using the rule of thirds can be a quick and easy way to make our composition feel more intentional.
Top tip: You can apply the rule of thirds to almost any type of visual media. It could help improve your slide presentations or even figures and science visualizations.
3. Framing
For the type and style of videos we want to make in this class, careful framing (choosing what to include and what to exclude from a shot) will have a greater visual impact on your video than trying to apply fancy composition technique. For this class, framing will be broken down into 4 main sub-categories:
3a. Video is shot in landscape, not portrait…most of the time
Smartphone screens are changing the way people are watching and shooting videos. People make vertically oriented videos and upload them to social media all the time. For many of those videos, the place where they are primarily viewed is on another phone, vertically. As I’m sure you have noticed, when those videos make their way onto horizontal screens like televisions and computer monitors they have to be accompanied by black borders to fill out the rest of the screen. Not only does this look terrible, but it reduces the size of the subject on screen. In the very near future, and depending on your audience, you may well be best advised to make a vertically oriented video that will only be seen on smartphone screens. But for now, and for this Scifund class, it is best to to follow in the footsteps of every other great director of the silver screen and record horizontally, unless your video is specifically for social media only.
3b. Background
Ask yourself what setting would be most relevant to your story? If you want to use audio from a particular shot, you will also have to think about how noisy the area is. The background should be relevant if possible, but definitely not distracting. When you have found your setting, it’s not a crime to tidy a few things or move the frame in order help get your message across. If your subject is small in frame then the rest of the frame or background should provide context to where the subject is. If there isn’t any useful context, or the background is too distracting, then consider moving the camera closer to the subject and filling the frame more with your subject. If you can see the horizon in the background, or any vertical things like trees, buildings etc, make sure your frame is level.
3c. Shot size
How close your subject is to the camera has a subtle effect on the meaning of the shot. Wider shots where the subject is smaller in the frame give more context and place the subject in the scene. It’s a visual way of saying ‘this is where the subject of this shot does the thing I’m talking about’, which is why the background should be relevant. On the other hand, close up shots where the subject fills most or all of the frame says ‘pay attention to this detail’. Most movies and television shows use a combination of wide and closer shots of some scenes to help progress the story. This doesn’t mean that you need to show a wide and close up of everything in your video, but it might be useful to have the other shot size recorded, in case you need it later. It would be a good idea to at least record your A-roll, your main story driving footage, at two different shot sizes. It is a luxury if you have more than one camera to record your A-roll, but you can cheat a little bit by recording a few takes in one shot size and then changing to a slightly wider shot and doing a few more takes of the same script. Bare in mind that a super close up of someone talking can be intense. Sometimes this is good for a short time to emphasize something, but too intense to stay very close for a long period of time. The classic ‘head and shoulders’ frame size is a comfortable shot size to use when we see a person talking on screen and probably as close as you want to get.
3d. Shot Angle
The angle you choose to shoot from also influences the meaning of a shot. The most neutral angle to shoot from is at the eye level of your subject. This is also why the best photos of animals and children are taken when the photographer gets down to their level, rather than shooting from above. When there’s someone talking on screen, It easily engages the viewer because this is the angle most of us have when we engage and communicate with other people.
Due to the fact that most of us spend most our lives looking from a specific range of angles, you can add emphasis and punctuation to a visual story by radically changing the angle you shoot to an extreme low or high angle. When we shoot people from a high angle, looking down on them, it can be flattering for your subject, but can also make them appear vulnerable or small. It can make the audience feel like they’re watching from a position of power like from a security camera, or on top of a structure. Conversely, shooting up at someone from a low angle can make a person on screen appear important or powerful, and the audience less powerful. This is why sports stars and celebrities are shot from a low angle sometimes, but it’s not always too flattering for every subject. We realize that the Gorillapod isn’t tall enough to reach eye level and higher on its own, but it is certainly versatile enough to attach to the back of a chair, stick, cabinet, tree, light fixture, TV, or a friend’s tripod to get the phone to the height you need. Don’t let the limitations of the equipment dictate the mood of your video.
Here’s a video we made that demonstrates some principles in Composition, Framing, and shot sizes:
4. Action!
Film has been described as a mercurial and ephemeral art form because at its center lies the moving image. Wherever you can, think about how you can capture movement in your subject. If your subject doesn’t move, move the camera as you record. Try up/down, left/right, and forwards/back, slowly, to draw your audience’s attention towards inanimate subjects. If you do move the camera, don’t include all directions in one take, but feel free to experiment and figure out which direction of movement best suits your inanimate subject.
If your subject is an immovable object, like a volcano (that isn’t erupting), or if your subject moves very slowly, like a plant, consider making a timelapse. Some new models of phone cameras support a timelapse mode. Failing that, there may be a timelapse camera app you can download. You can also just record video for an extended period of time and speed it up in the editing software later.
Here’s a tutorial on shooting timelapses on the iPhone:
The final additions you should make to your storyboard in column 3 are “notes” which describe how you want to shoot the shots you have listed in each section. This is really useful when you go out to get your material to make sure that you capture your footage the way you envisioned during this script making stage.
PART SIX: CONSOLIDATED TO-DO LIST
- Right away, please sign up for a Google Meet session for the week. It would be helpful if you have done the week’s tasks before your hangout, but if you have just had time to read the week’s instructions that will be fine.
- Also right away, find a partner with whom to practice your script. The reason to do this right now is that may take you some time to find a partner whose schedule works with yours. You can find the spreadsheet for partner-finding HERE. Instructions on how to use the spreadsheet to find a partner are on the top row of the spreadsheet. In summary, you’ll be: A) finding a partner whose schedule is compatible with yours, B) contacting them to arrange a 30 minute period where you can meet via Google Hangouts (or Skype or similar), and C) having a conversation over video to practice your script (detailed instructions on what to do during this conversation are below).
- Following the instructions above, complete your video planning and storyboard.
- Start by writing down the top line message for each section of your story arc.
- For each section, write your script as well as the emotional response you hope to engender with that section.
- Fill out your storyboard and decide on the shots you want for each section of your script and add notes on how you will shoot them (shot size, angle, etc.).
- Record your script. If you’re planning to be in your video, record your A-roll. Make sure you have at least 4 good takes of each section (two takes in two different shot sizes, one wider, one closer).
- Start shooting clips for your videos!
- Meet with your partner to practice script (Note: you don’t need to have completed all steps of this to-do list before your meeting). Here’s how this exercise should work.
- Contact your partner to find a time to connect via some video chat platform (set aside about 30 minutes for your meeting).
- Prior to your meeting, please have completed parts 3a and 3b of this to-do list (scriptwriting).
- During the meeting itself, please practice your script with your partner. Be sure to deliver the script using the suggestions provided in these instructions.
- You want your partner to be coming to your topic fresh, so please don’t share your script with your partner ahead of time. During your meeting, you just need to give your partner your intended audience before you launch into your script.
- If you are hearing your partner’s script, try to put yourself in the shoes of the intended audience. Provide feedback on at least the following questions:
- Is the script clear for the intended audience?
- Does the script connect? Specifically why or why not?
- Are there sections where your attention wanders?
- Does the language seem appropriate for the intended audience?
- Does any part of the script seem out of place or unrealistic for the intended audience?
- Does the delivery seem conversational?
- No doubt, you and your partner will have many suggestions for each other. Repeat practicing with your partner until both of you are satisfied.
- We’ll talk about how the week is going through an hour discussion, via Google Meet (please sign up for one section this week).
Thanks everyone, looking forward to seeing/hearing your scripts!